Welcome to the "Solana Simplified" series, designed to help you master Solana's intricate ecosystem. In the first article, we explored Solana's operating mechanism, account model, and transaction structure. In the second article, we guided you through writing and testing your first Solana program in Rust.
As the third and final part of this series, this article will guide you through analyzing a simple Solana transaction using Phalcon Explorer. Before we dive into practical Solana transaction analysis, let’s first explore how tokens are implemented on Solana, a fundamental aspect of understanding transaction flows.
Understanding Solana Token Implementation
Tokens on Solana can be broadly classified into two categories: Native Token and Other Tokens (SPL Tokens). Grasping these distinctions is crucial for effective Solana transaction analysis.
Native Token (SOL)
The Native Token refers to Solana's primary cryptocurrency, SOL. As mentioned in the first article, every account in Solana has a Lamports field, which records the balance of SOL in that account. Lamports are the smallest unit of SOL, with 1 SOL equating to 1 billion Lamports. SOL is used for transaction fees, staking, and network participation.
Other Tokens (SPL Tokens)
For Other Tokens, Solana utilizes a robust framework built around a program account (the Token Program) and two types of data accounts: the Mint Account and the Token Account. This architecture provides all the necessary functionalities for managing and interacting with various tokens on the Solana blockchain.
The Solana Token Program
 The Token Program is a program account provided by the Solana Program Library (SPL), making its
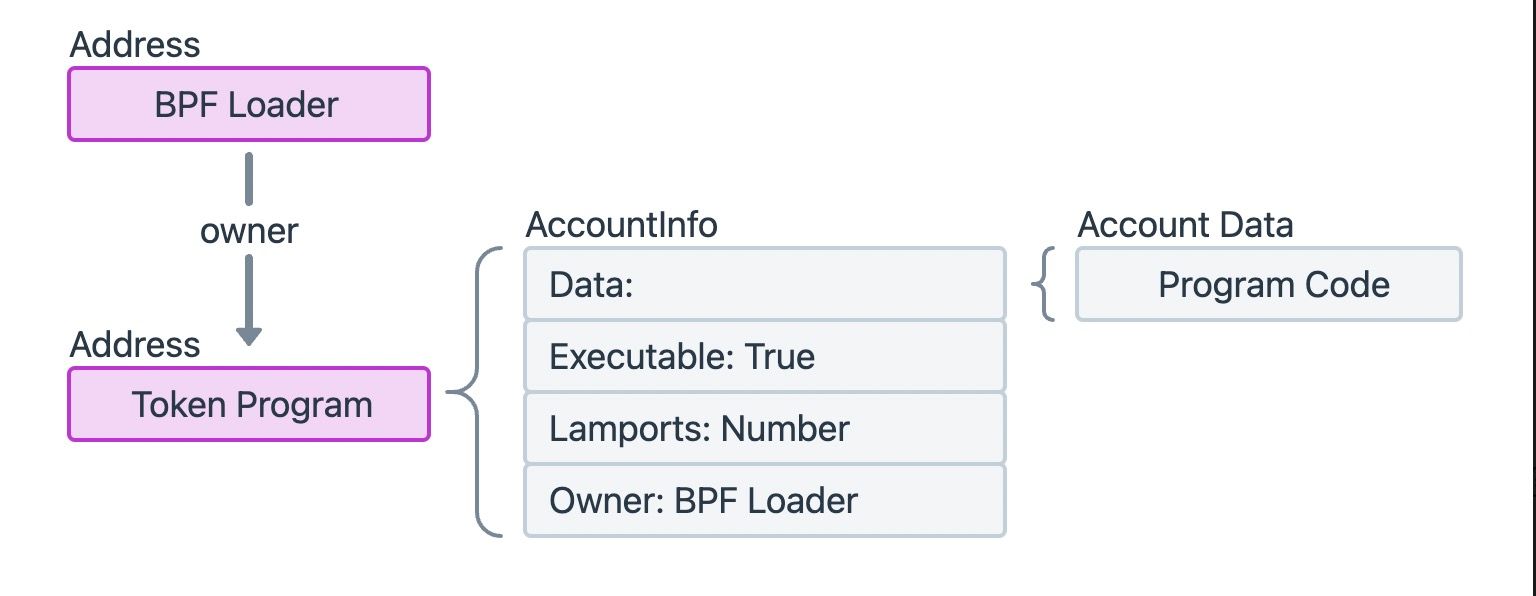
 Executable field within AccountInfo True.
Similar to the System Program, the Token Program is deployed at a fixed address on Solana, and its owner is the BPF Loader. As a powerful program account, it implements numerous instructions to provide diverse token functionalities. For example, some instructions are used to create a Mint Account to initialize a new token, or to create a Token Account to record the number of tokens held by a particular address. Other instructions facilitate essential token operations, such as the MintTo instruction for increasing the token supply, or the Transfer instruction for transferring tokens between two addresses.
It is important to note that since the Token Program is responsible for creating Mint Accounts and Token Accounts, it is also the owner of these accounts, granting it control over their lifecycle and data.
Mint Account Structure
 A Mint Account is a data account, meaning its
 Executable field in AccountInfo is False. On Solana, each unique token (e.g., USDC, RAY, etc.) corresponds to a single Mint Account. This account stores critical information such as the total supply of the token, the number of decimals, and the address of the account with the authority to mint (create new) or burn (destroy) the token.
Token Account Structure
A Token Account records the amount of a specific token held by an individual or another program. For each type of token, every entity holding that token has a corresponding Token Account. For instance, if a user holds five different SPL tokens, they will have five distinct Token Accounts, one for each token type.
Token Account is a data account, and the Data field of its AccountInfo typically consists of three key sub-fields:
- Mint: The address of the Mint Account corresponding to this specific Token Account, identifying which token it holds.
- Owner: The public key of the account with the privilege to transfer tokens from this Token Account. This is the true "owner" of the tokens.
- Amount: The current number of tokens held in this Token Account.
 It should be emphasized that the
 owner field in AccountInfo (which dictates who can modify the account's data) and the owner field within the Token Account's Data (which specifies who owns the tokens) are entirely different concepts. The former is a general Solana account property, while the latter is specific to SPL Token Accounts.
Connecting these concepts, we can visualize the account relationship diagram below. Both the System Program and the Token Program are deployed at unique, fixed addresses on the blockchain and function as core libraries. A wallet account may hold multiple Token Accounts, and it is the true "owner" of the tokens within these Token Accounts. The Mint field in Token Accounts of the same type points to the unique Mint Account for that token, which records information such as the token's total supply.

Analyzing Solana Transactions with Phalcon Explorer
While traditional explorers like Solscan provide valuable data, they can sometimes present information in a way that is less intuitive for detailed Solana transaction analysis. Let's first look at a transaction in Solscan and then see how BlockSec's Phalcon Explorer offers a clearer, more comprehensive view.
Viewing Token Accounts in Solscan
We can use Solscan to view the changes in Token Accounts within this example transaction:
 The
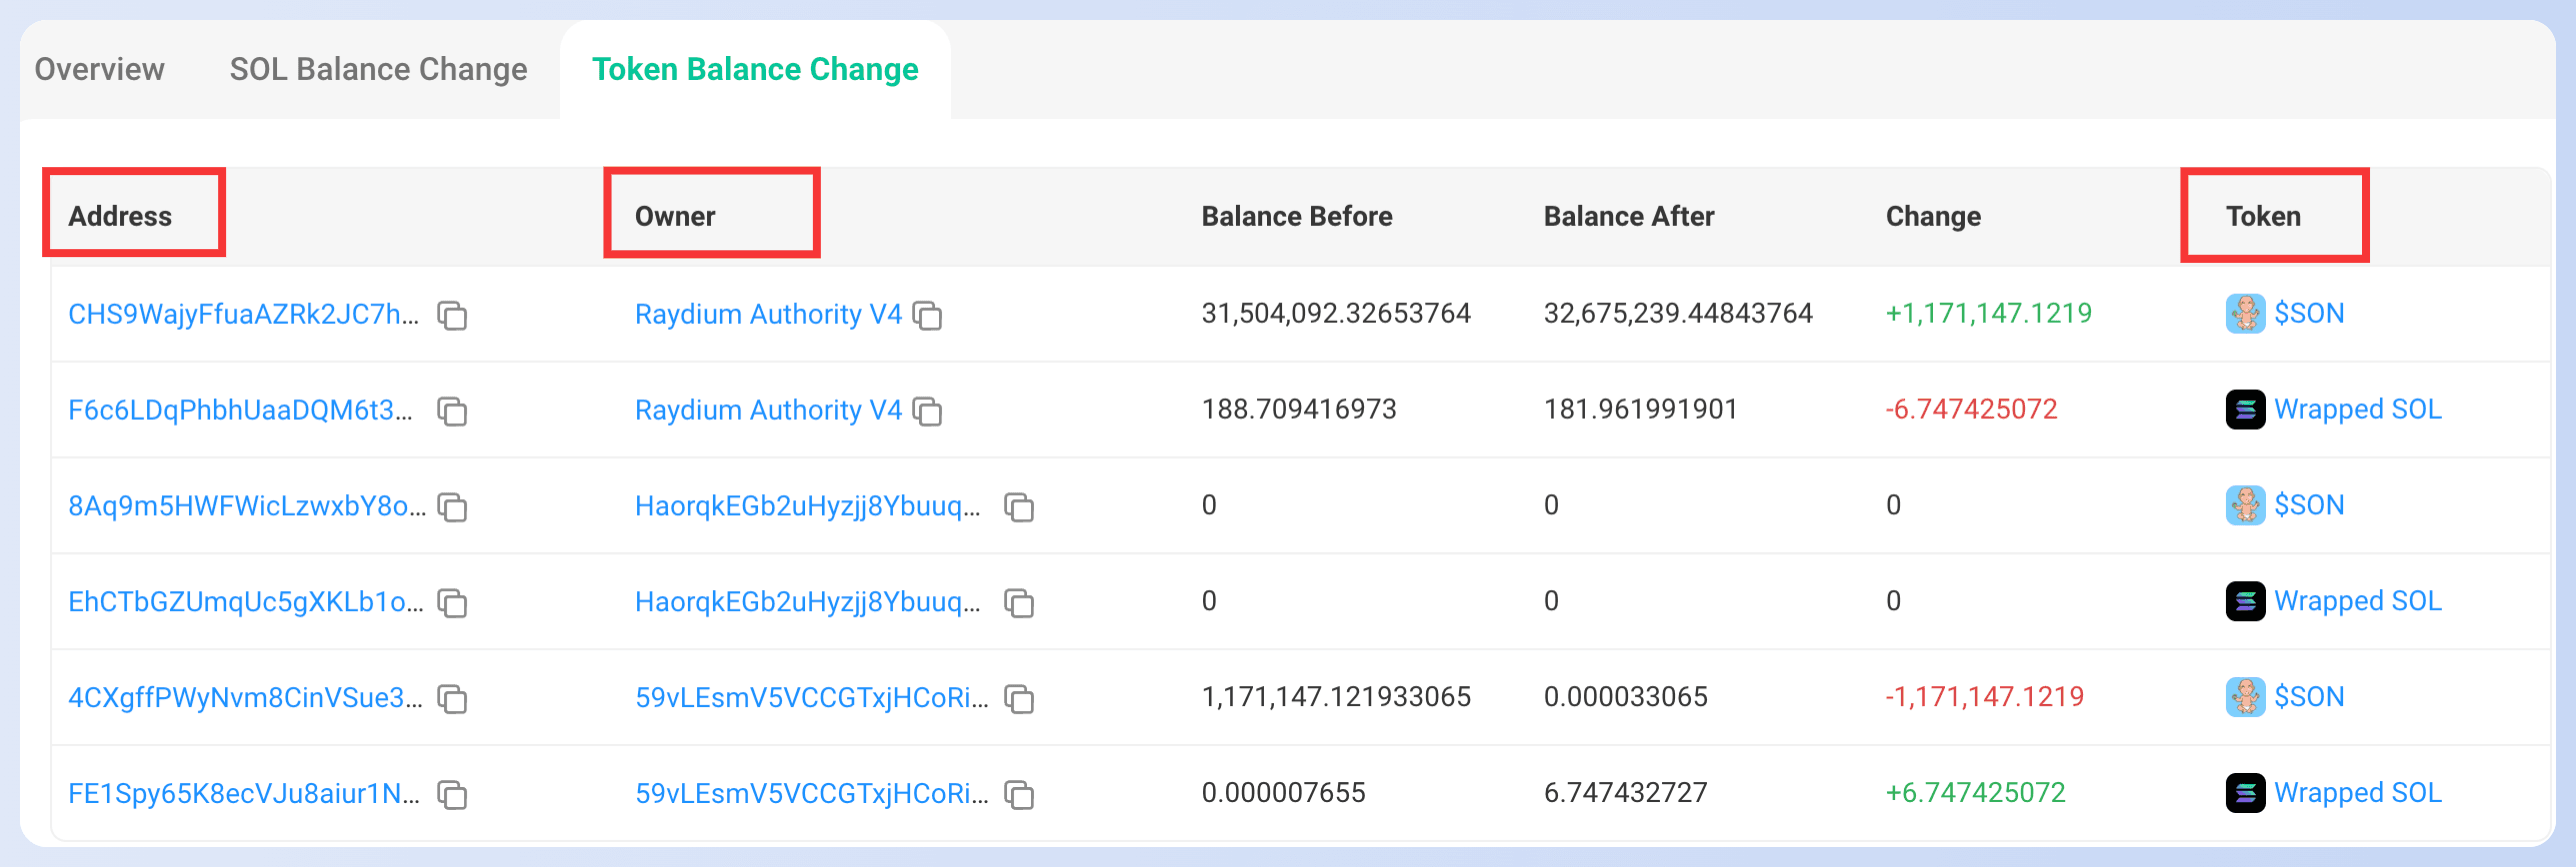
The Address column lists all the Token Accounts involved in the transaction. The Owner column indicates the true "owner" of the token (the owner in the Token Account Data field). The Token column corresponds to the Mint Account of the current token. We can click on the "$SON" on the right side of the first row for more details:
 The
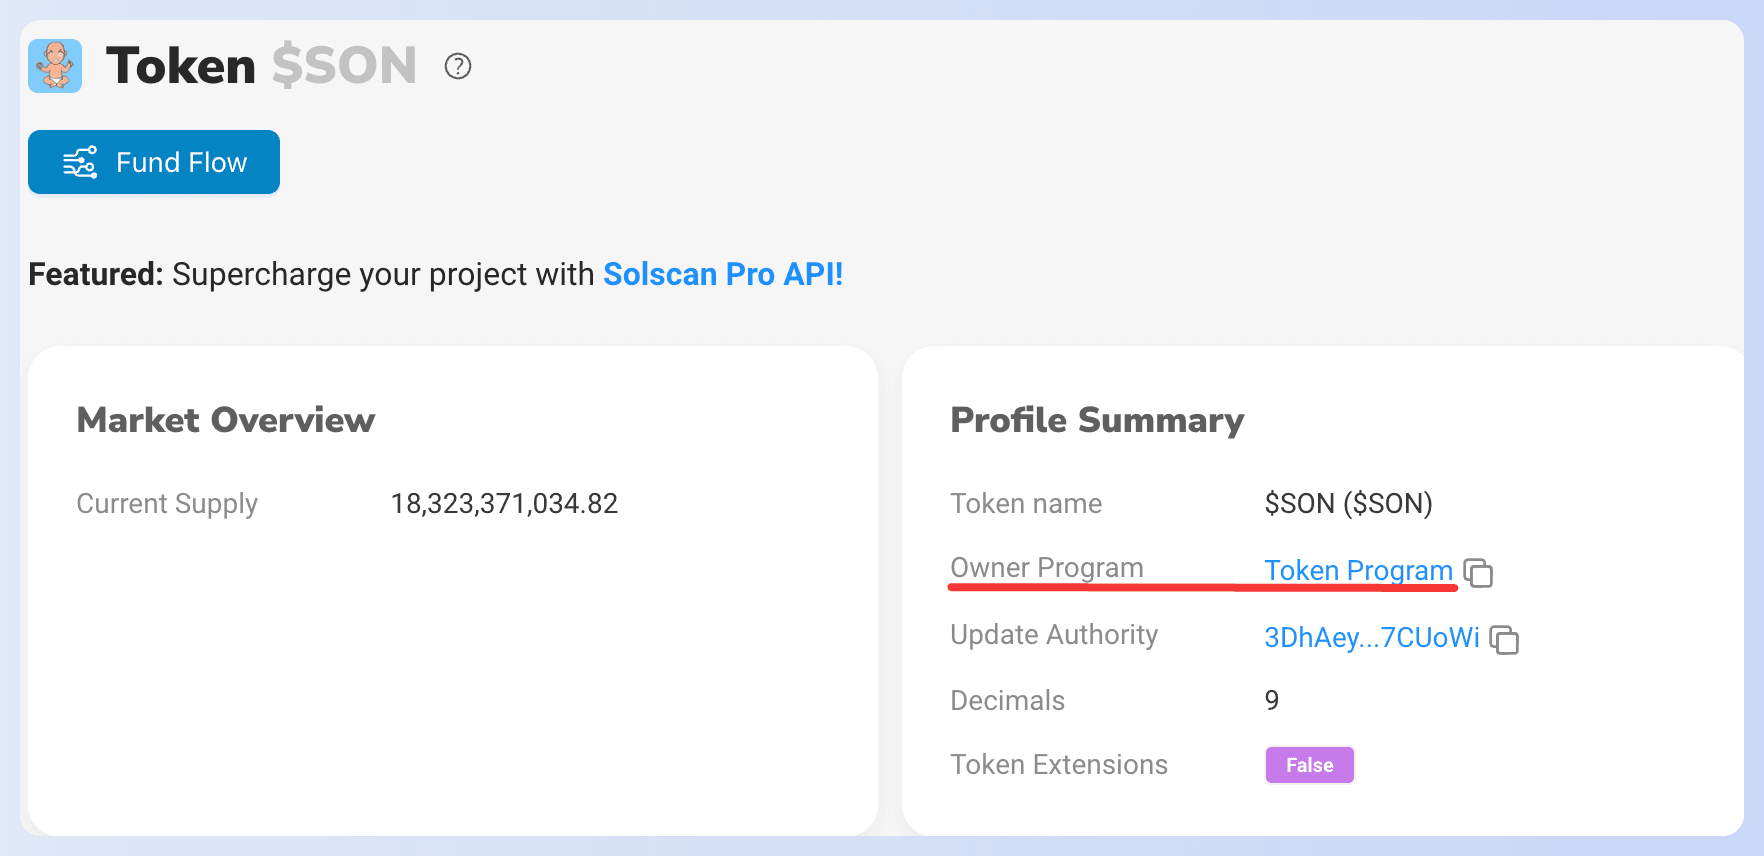
The Owner Program in the Profile Summary indicates that the owner of the current Mint Account is the Token Program. By now, we have matched all three types of accounts in Solscan.
However, this display in Solscan can be somewhat misleading. For instance, in the previous image, it is unclear whether the increased balance in the first row belongs to the address CHS9WajyFfuaAZRk2JC7hRJvPHXmG5fC94gtAPbnLjuY or Raydium Authority V4. Such ambiguity increases the difficulty for users to understand the transaction's true flow. Additionally, readers might notice that SOL tokens and other tokens are displayed in separate sections in Solscan. While this separation is technically reasonable, it would be easier to understand if they were presented together under a unified token section for a holistic view of asset changes.
Phalcon Explorer not only addresses these issues but also introduces many other innovations for detailed Solana transaction analysis. Now let's use Phalcon Explorer to examine the same transaction.
We highly recommend opening the link to the transaction in Phalcon Explorer and following along with our steps to analyze it together. This interactive approach will allow you to better understand the transaction details and appreciate the powerful features of Phalcon Explorer for Solana transaction analysis!
Viewing and Analyzing Transactions in Phalcon Explorer
 At the top left corner of the page, you can see that the current transaction has been identified as a JITO MEV transaction, a valuable piece of information for security analysts. You can also click on the Solana icon next to the transaction signature to jump directly to Solscan if needed.
The information about this Solana transaction is logically divided into four key sections: Basic Info, Fund Flow, Balance Changes, and Invocation Flow. You can seamlessly switch between these sections by clicking the icons in the top right corner, allowing for a comprehensive Solana transaction analysis.
Basic Info
 The Basic Info section offers essential details about the current Solana transaction. You can click on the block number and signer's address to jump to Solscan for cross-referencing or further context. This section provides a quick overview before diving into the specifics of the transaction's execution.
Fund Flow
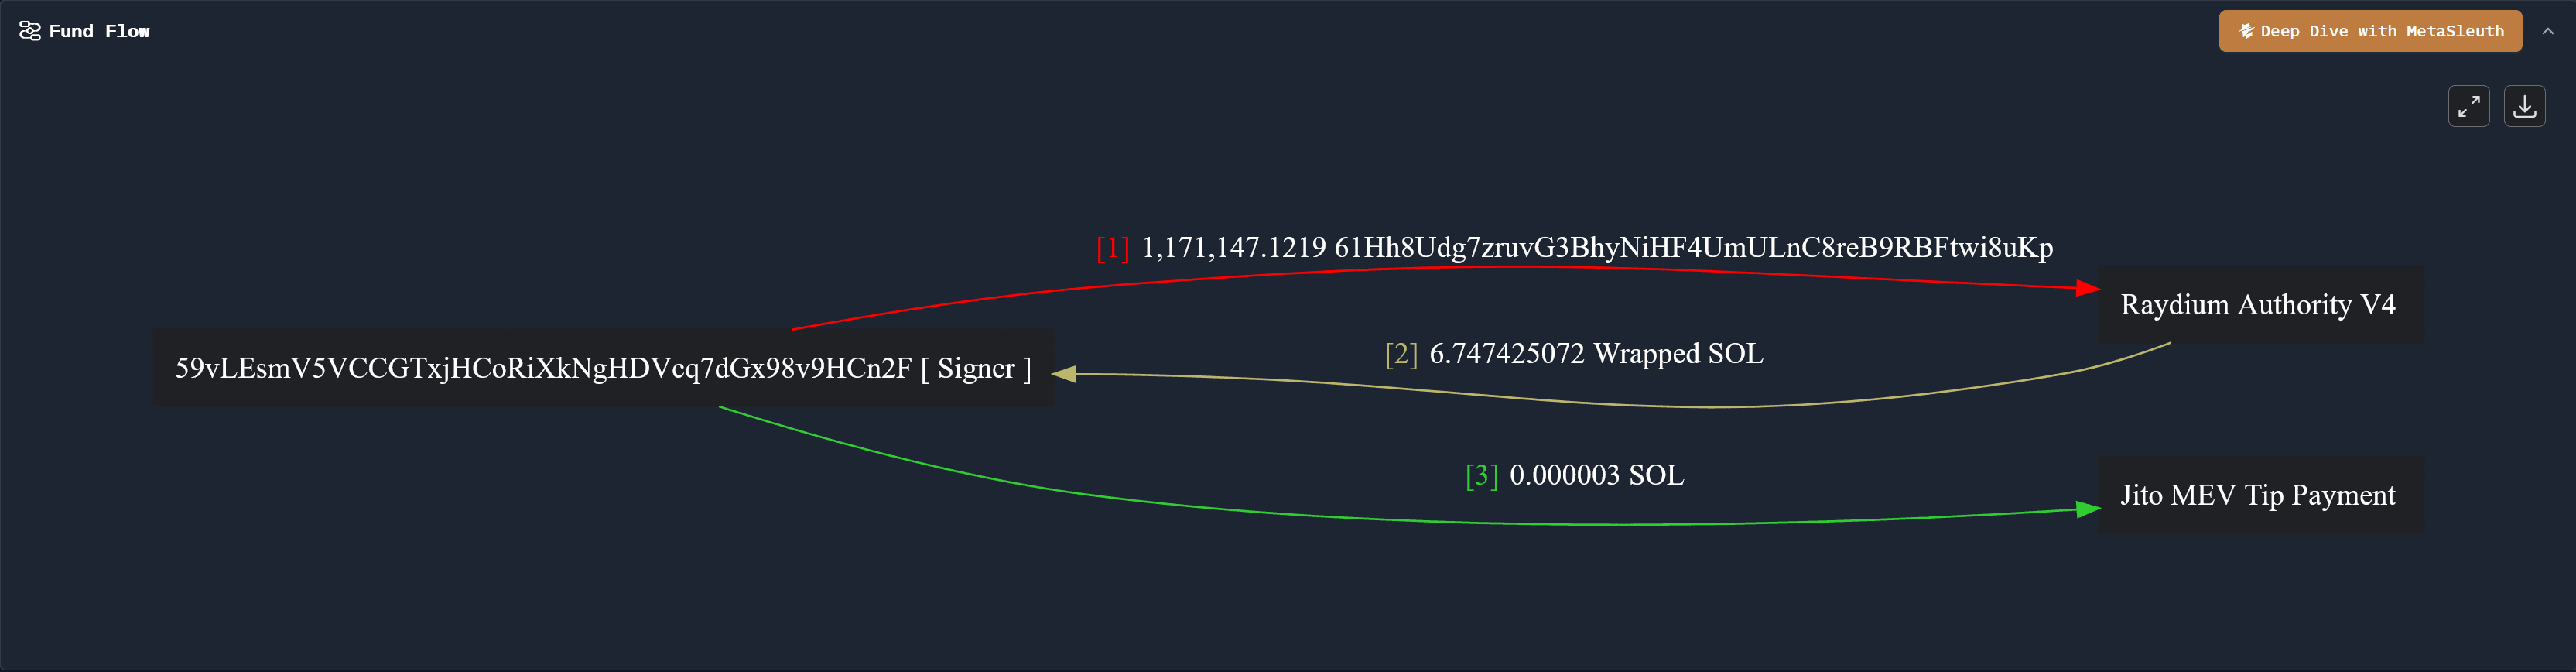 The Fund Flow section provides a clear, visual representation of the movement and timing of funds during the transaction execution, making Solana transaction analysis intuitive:
- The transaction initiator and signer,
59vLEsmV5VCCGTxjHCoRiXkNgHDVcq7dGx98v9HCn2F, first transferred a certain amount of a token to the address labeled asRaydium Authority V4. - Next,
Raydium Authority V4transferred approximately 6.747 Wrapped SOL Tokens back to the signer,59vLEsmV5VCCGTxjHCoRiXkNgHDVcq7dGx98v9HCn2F. - Finally, the signer provided 0.000003 SOL to Jito as a tip to the Jito validator for executing the transaction, indicating an MEV-related activity.
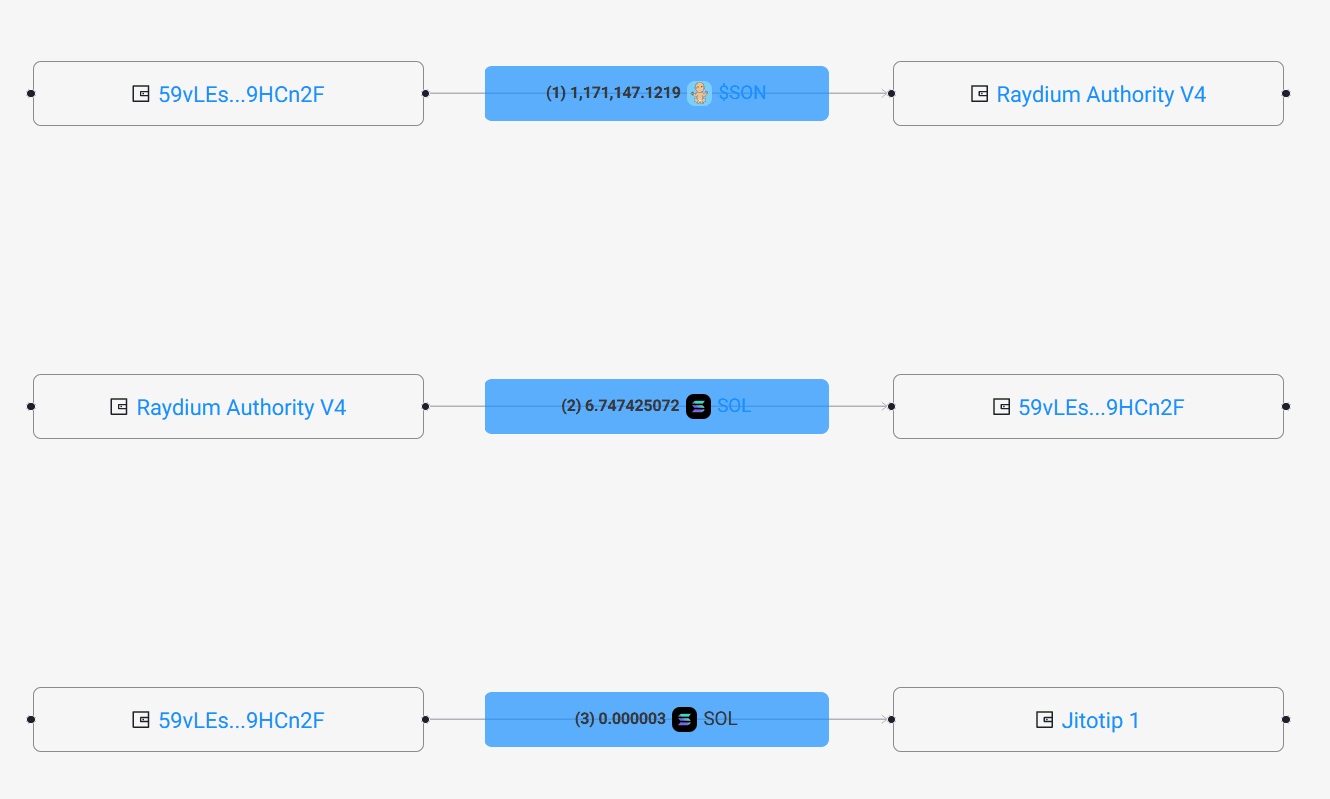
Below is the fund flow diagram from Solscan for comparison. Compared to Solscan, each address in Phalcon Explorer's fund flow diagram corresponds uniquely to a single node, making it significantly easier to identify the relationships between addresses and thus improving analysis efficiency, especially for complex Solana transactions.
 If you want to conduct a deeper analysis of the transaction's fund flow, perhaps for incident response or forensic investigations, you can click on the brown icon in the top right corner to enter MetaSleuth, BlockSec's advanced on-chain analysis tool.
Balance Changes
 The Balance Changes section clearly shows the token changes for different accounts after the Solana transaction concludes. This unified view is a significant advantage for Solana transaction analysis.
For example, the signer of the transaction, 59vLEsmV5VCCGTxjHCoRiXkNgHDVcq7dGx98v9HCn2F, experienced changes in three types of tokens: the native token SOL, a token named 61Hh8Udg7zruvG3BhyNiHF4UmULnC8reB9RBFtwi8uKp (likely an SPL token), and Wrapped SOL Token.
Each Account Address that appears in Balance Changes has one or more Token Accounts associated with it. By clicking on the respective address, you can copy it or jump to Solscan for additional context.
Phalcon Explorer does not distinguish between SOL tokens and other SPL tokens in this view, which directly reflects changes in all tokens for a given account. This unified presentation makes it much easier to visualize the relationship between a Token Account and its Owner, offering a more complete picture of asset movements during Solana transactions.
Invocation Flow
 The Invocation Flow records the execution process of the transaction's instructions, with each line corresponding to an instruction executed during the Solana transaction. This section is invaluable for understanding the precise sequence of operations within a smart contract interaction or program call.
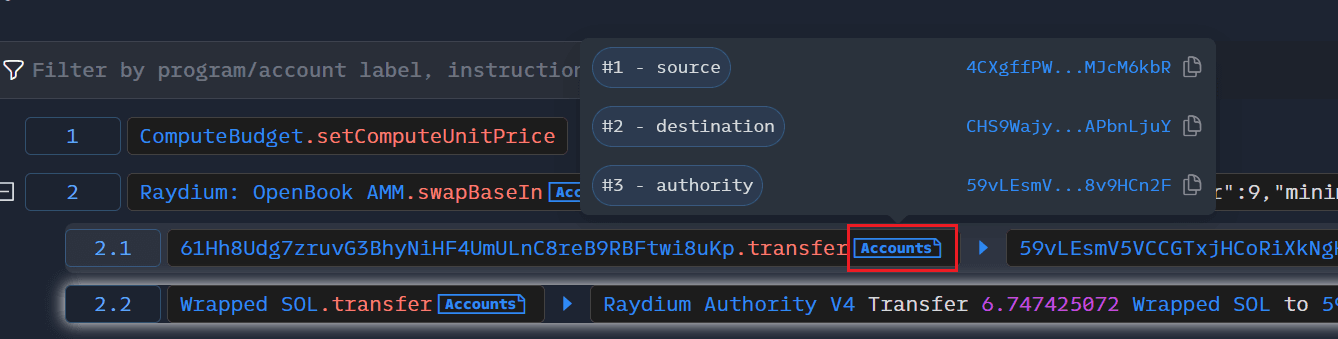
Here, we focus on instructions 2 and 4, which involve token transfers.
The second instruction calls Raydium AMM's swapBaseIn to sell a token. Expanding this instruction reveals that it consists of two CPI (Cross Program Invocation) instructions, which facilitate the token transfer between Raydium Authority V4 and the transaction signer. The fourth instruction is the process where the signer pays a tip to Jito, confirming the MEV nature of the transaction.
As shown in the figure below, by clicking on the Accounts tab following each instruction, we can view all the accounts involved in that specific instruction. Compared to Solscan, this display method is more concise, allowing analysts to focus on the more critical information in the transaction without being overwhelmed by extraneous details. This granular view is essential for in-depth Solana transaction analysis and debugging.
Conclusion
In this article, we first introduced the implementation principles of Solana tokens, covering Native SOL, Token Programs, Mint Accounts, and Token Accounts. We then used Solscan to examine the changes in Token Accounts for a specific transaction, highlighting some of its limitations. Finally, we conducted a further, more in-depth analysis of the same Solana transaction using BlockSec's Phalcon Explorer, showcasing its innovative features that provide superior clarity and insights for Solana transaction analysis.
This concludes the "Solana Simplified" series. We hope you found it helpful in understanding Solana's core concepts and practical transaction analysis. If you have other topics you'd like to learn about, such as specific security incidents, ecosystem introductions, or other BlockSec products, feel free to leave a comment! 🫡