Introduction
In 2024, Solana surged to prominence, becoming the fourth-ranked public blockchain by Total Value Locked (TVL), capturing the interest of investors and developers.
BlockSec has curated the "Solana Simplified" series, which includes articles on Solana's basic concepts, tutorials on writing Solana smart contracts and guides for analyzing Solana transactions. The goal is to help readers understand the Solana ecosystem and master essential skills for developing projects and conducting transactions on Solana.
In the first article of this series, we delved into key concepts of the Solana network, including its operating mechanism, account model, and transactions, laying a solid foundation for writing correct and high-performance Solana contracts.
In this article, we will guide you through writing a Solana program (i.e., a Solana smart contract) for posting and displaying articles. This will help solidify the concepts from the first article and introduce some features about Solana we haven't yet discussed. The relevant program and test code have been published on GitHub.
Set Up the Environment
Note: The following commands only covers the Ubuntu system. Some commands may not work under Windows and macOS systems.
👉 You can use alternative commands or refer to Setup local development and install the Solana CLI to solve this.
We will compile and deploy Solana programs in the local environment. Before diving into Solana program development, we need to install some commands and dependencies.
Rust
Solana programs are predominantly written in the Rust programming language, so we need to execute the following command to install Rust:
curl --proto '=https' --tlsv1.2 -sSf https://sh.rustup.rs | shnode.js & TypeScript
The test script is wirrten in TypeScript, so we need to install Node.js and TypeScript toolchain:
curl -fsSL https://deb.nodesource.com/setup_15.x | sudo -E bash -
sudo apt-get install -y nodejs npm
npm install -g typescript
npm install -g ts-node
Solana CLI
Next, we need to install the Solana CLI tool, which provides commands for tasks such as creating wallets, deploying contracts:
sh -c "$(curl -sSfL https://release.solana.com/stable/install)"Run the following command to apply the changes to the current terminal:
source ~/.profileYou can execute solana --version to verify that the Solana CLI has been successfully installed:
$ solana --version
solana-cli 1.17.25 (src:d0ed878d; feat:3580551090, client:SolanaLabs)
Local Wallet
Next, execute the following command to generate a local file system wallet:
solana-keygen newBy default, this command creates a private key file at ~/.config/solana/id.json, which we will use in the test script later. You can use the solana address command to see the address generated by it:
$ solana address
9FcGDHvzs8Czo4B1pQq8GPdXfdGHqNqayvh6bu4hVGfy
Devnet
The program will be deployed on devnet, so we need to execute the following command to switch the Solana CLI to devnet:
solana config set --url https://api.devnet.solana.comSOL Tokens
Since deploying contracts and sending testing transactions are not free, we need to request some SOL tokens. You can execute solana airdrop 2 or directly request tokens from the public web faucet.
Write the Program
The program we are going to introduce allows users to post articles and list all currently posted articles. It handles three types of instructions:
- init instruction: Initializes the program by creating a data account to store the current maximum index of articles.
- post instruction: Stores a posted article in a new data account.
- list instruction: Prints all posted articles in the log.
Below is the structure of the program:
$ tree program/
program/
├── Cargo.lock
├── Cargo.toml
└── src
    ├── instructions
    │   ├── init.rs
    │   ├── list.rs
    │   ├── mod.rs
    │   └── post.rs
    ├── lib.rs
    └── processor.rs
Cargo.toml specifies the external libraries for the project:
[dependencies]
borsh = "0.10.0"
borsh-derive = "0.10.0"
solana-program = "=1.17.25"
Note: The version of solana-program should match the version of Solana CLI installed (you can check this using
solana --version). Otherwise, you may encounter errors during compilation.
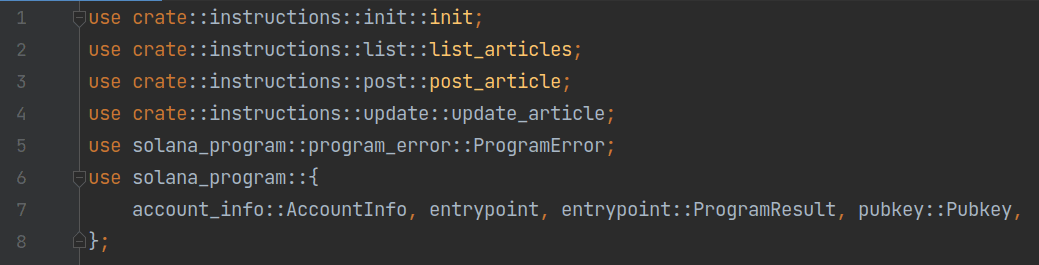
The entry function of the contract is defined in processor.rs. The file starts by importing required dependencies (we will skip similar parts in other Rust files):
Next follows the definition of the contract's entry function:
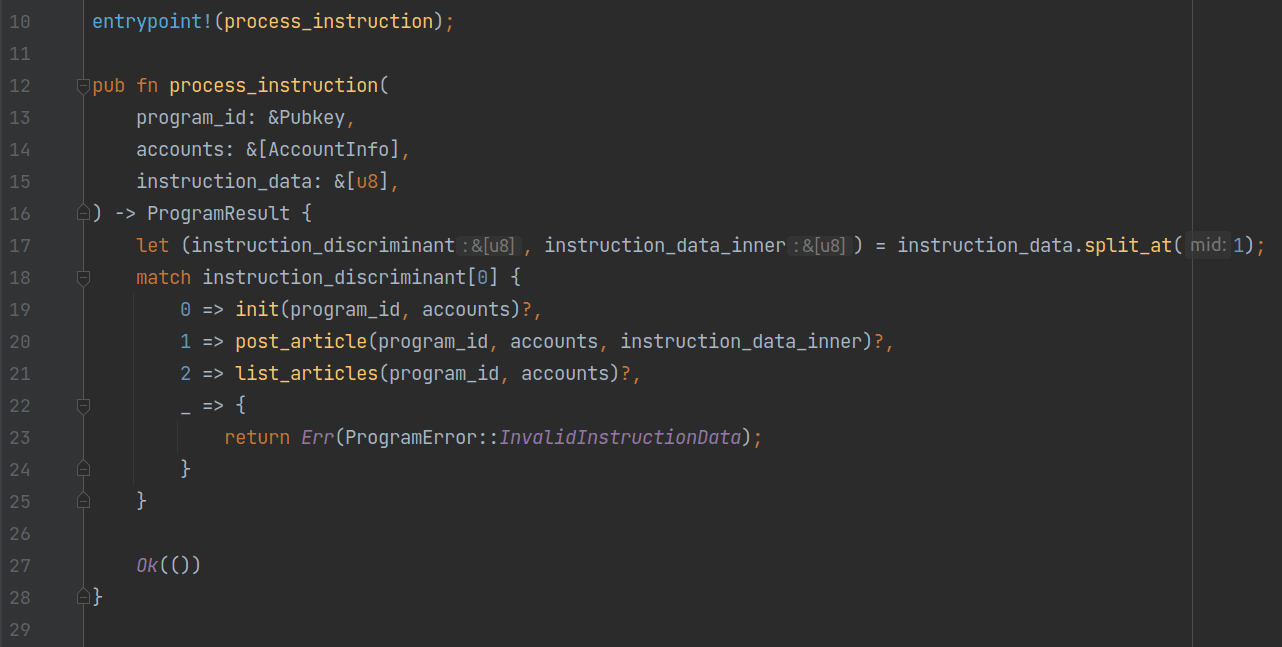
In line 10 of the program, the macro entrypoint! from the Solana library specifies that the entry function is process_instruction. This function takes three parameters:
- program_id: The deployed address of the current program.
- accounts: All accounts involved in the instruction.
- instruction_data: The byte array used for processing instructions.
process_instruction extracts the first byte of instruction_data to identify the type of instruction and calls corresponding function to handle it. Next, we will look at how these three functions are implemented.
init
Each of the three functions is defined in a file with the same name under the program/src/instructions directory. Let's start with init.rs.
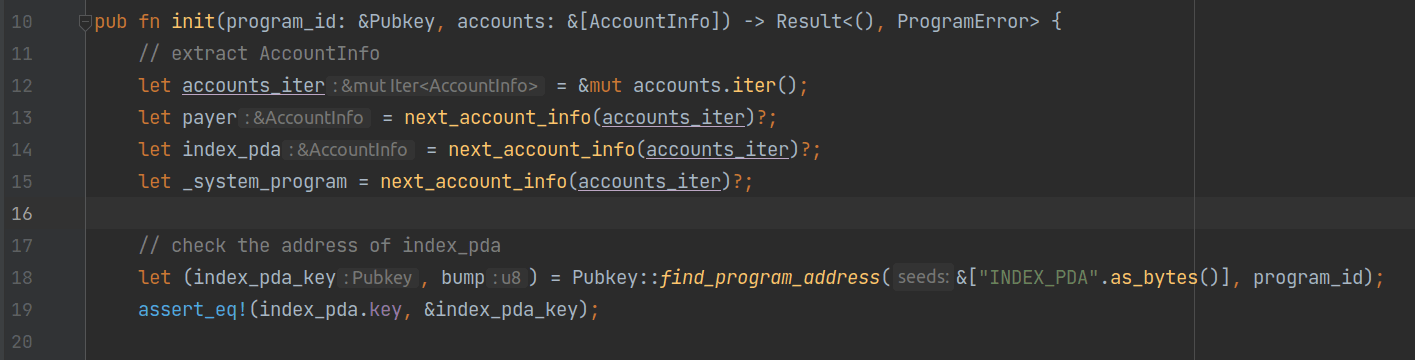
Since the init instruction does not require an additional byte array, it only accepts two parameters: program_id and accounts.
Between lines 12 and 15, the program extracts the required account information sequentially, then calls the find_program_address function to compute the address of the data account used to store the current maximum article index, index_pda_key. Then the program asserts that index_pda_key equals to the address of index_pda.
Here, The address of index_pda is a special address called PDAs (Program Derived Addresses). Unlike "wallet" account addresses generated from public keys, PDAs are derived from an optional byte array, a byte called "bump", and the address of a program. The byte array and program address are explicitly provided by the caller, while the bump is automatically generated and returned by the find_program_address function. The bump ensures that addresses created in this way cannot collide with addresses generated by public key.
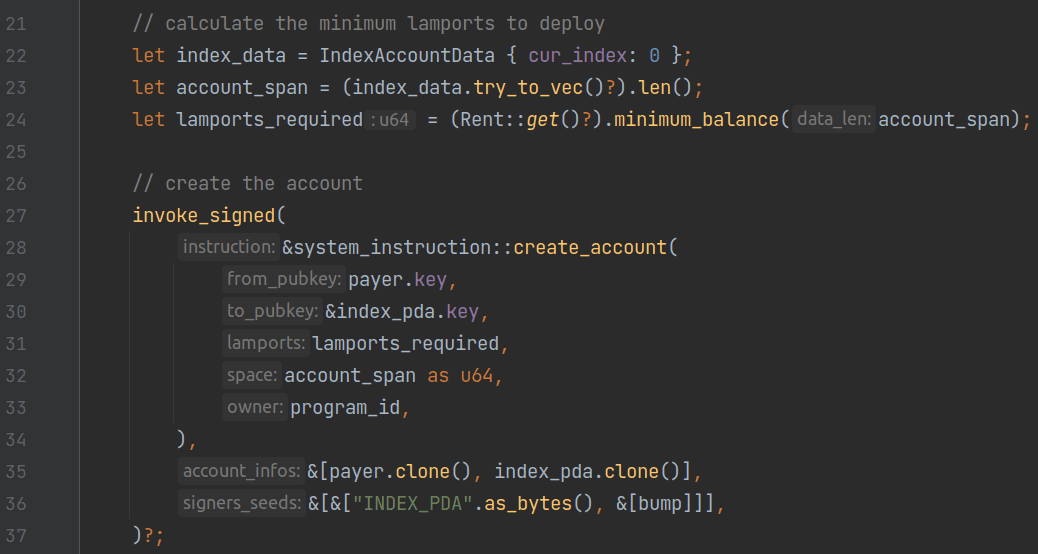
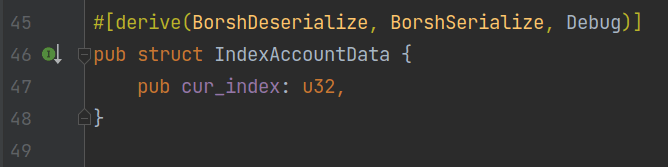
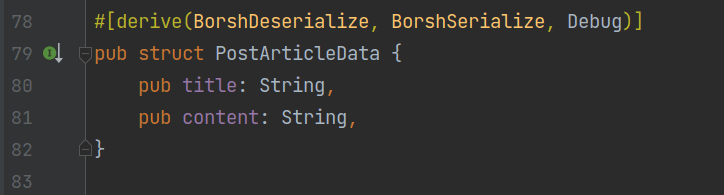
After confirming that the address of index_pda is expected, we use the create_account instruction provided by the SystemProgram to create index_pda. In line 22, the program creates a variable of type IndexAccountData, which records the current maximum index of articles (initialized to 0). As shown in the figure below, this type implements the BorshSerialize and BorshDeserialize traits, allowing it to be serialized and deserialized in Borsh format:
Lines 23 to 24 calculate the required space for storing the account data and the minimum rent for creating the account.
Lines 27 to 37 create a create_account instruction from the SystemProgram and invoke it using the invoke_signed method. The action of invoking an instruction to another program within one program is referred to as CPI (Cross-Program Invocation). In Solana, you can use two functions to perform CPI: invoke and invoke_signed.
The invoke function directly processes the given instruction, and its function signature is as follows:
pub fn invoke(
    instruction: &Instruction,
    account_infos: &[AccountInfo<'_>]
) -> Result<(), ProgramError>
The only difference between invoke_signed and invoke is that invoke_signed provides a way to sign for PDA accounts. PDA accounts do not have public-private keys and therefore cannot provide signatures directly. invoke_signed solves this problem. This function accepts an additional parameter called signers_seeds. Its function signature is as follows.
Similar to how the find_program_address function works, invoke_signed computes a set of PDA addresses based on the provided signers_seeds and the caller's program_id. If account_infos contains these PDA addresses, they will be marked as signers, as if they have provided signatures.
pub fn invoke_signed(
    instruction: &Instruction,
    account_infos: &[AccountInfo<'_>],
    signers_seeds: &[&[&[u8]]]
) -> Result<(), ProgramError>
Here, since the create_account instruction requires the account being created to be a signer, we have to use invoke_signed to provide a signature for index_pda.

At the end of the program, the contract calls the serialize method on index_data to serialize the data and write it into the data field of index_pda.
post_article
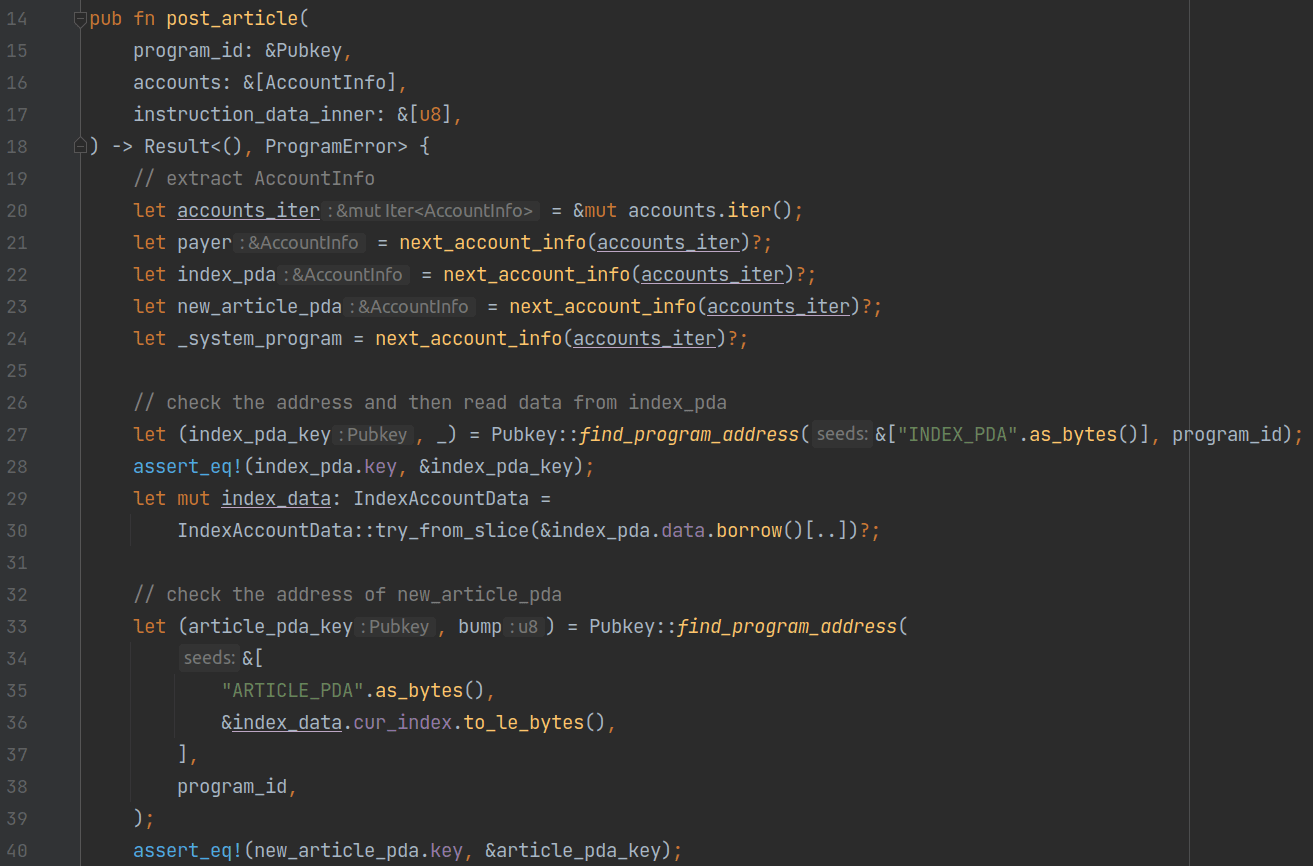
Next let's look at the implementation of the post instruction. Unlike the init instruction, the post instruction accepts a posted article, so it has an additional parameter called instruction_data_inner, which stores the serialized data of the article.
As usual, the program begins with extracting the account information required by the instruction. Since we generate a separate PDA account for each article, the program accepts an additional account, new_article_pda, on line 23.
Similar to the init instruction, lines 27 to 30 use find_program_address to verify that the passed index_pda's address is correct. We then deserialize the data in its data field to read the current maximum index allocated.
Lines 33 to 40 also verify the address of new_article_pda. The program uses the string “ARTICLE_PDA” and the current index to generate a new address. The index increments with each article upload, which ensures the generated address is unique.
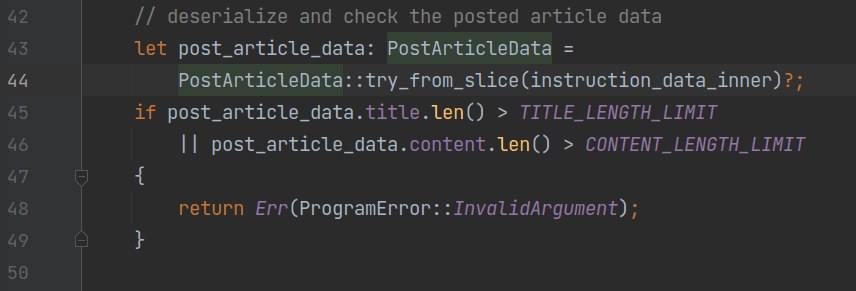
Next, the program deserializes instruction_data_inner into article data, which is of type PostArticleData:
This structure has only two fields: title and content. On lines 45 to 49, the program performs a check to ensure that the article is not too large to be contained within a single account.
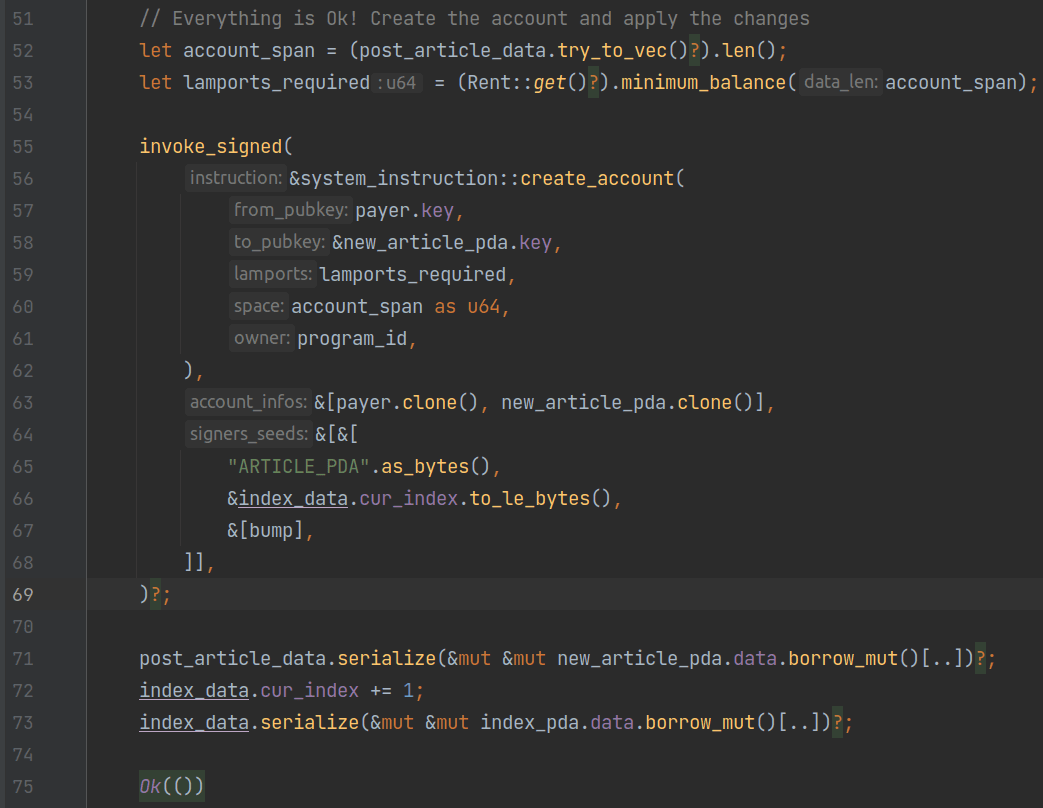
The following steps are also similar to the init instruction: The program first calculates the required space and rent for the account, then it invokes the create_account instruction of the SystemProgram to create the PDA account for storing the article. Finally, the posted article is serialized into the data field of new_article_pda, and the current maximum index is incremented by one and serialized into the data field of index_pda.
list_articles
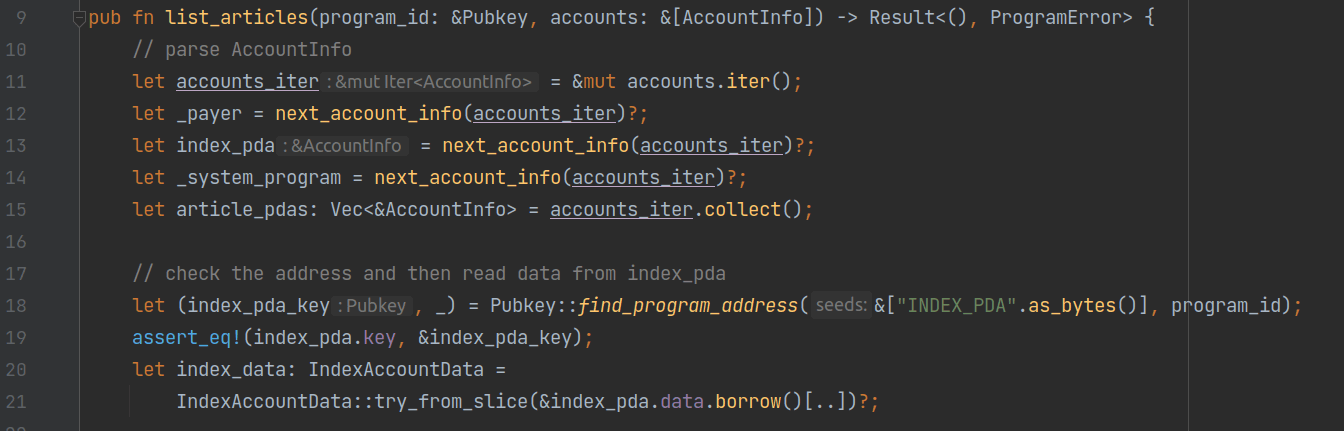
Finally, let's see the implementation of the list instruction. Because this instruction needs to list all articles, a vector is used on line 15 to represent all the PDA accounts storing the articles, and the index_pda account's address is also validated.
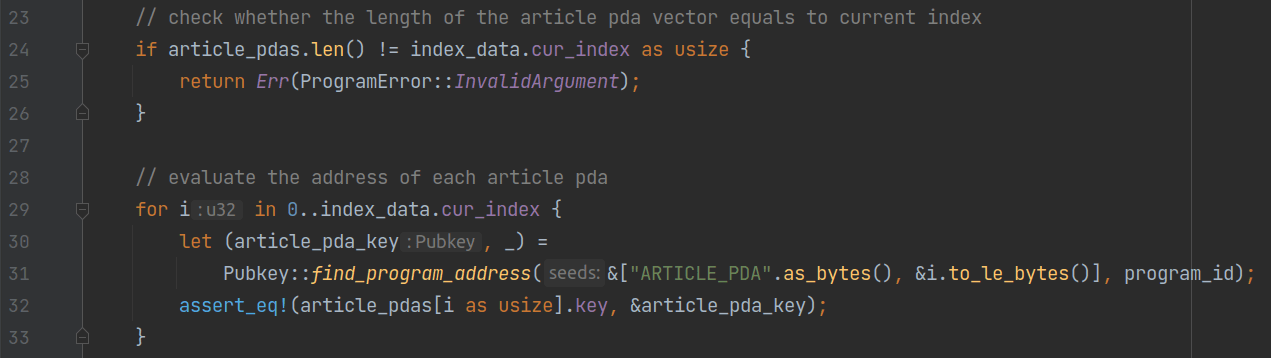
After that, the program verifies that the vector's size is the same as the current maximum index and checks the correctness of each account's address.
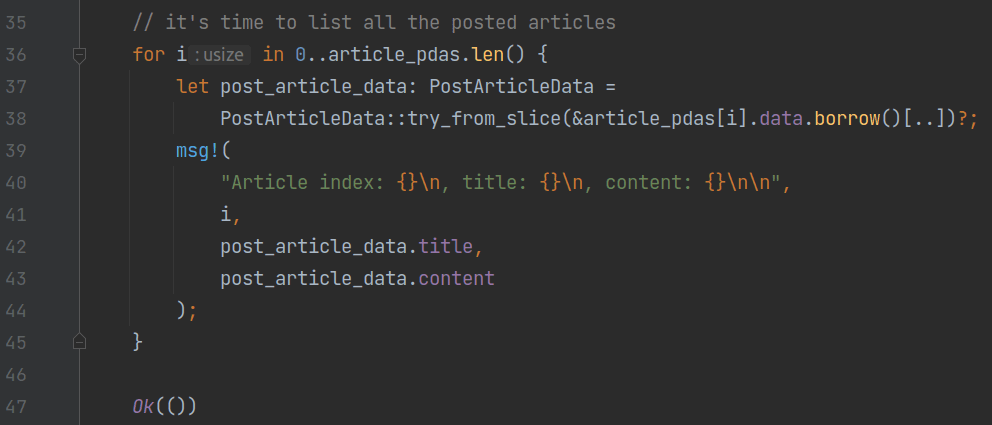
At the end of the program, it iterates over each account and uses the msg! macro from solana-program to output the deserialized article content one by one.
Transaction Testing
To test our contract, we use a TypeScript script located at client/main.ts in the repository.
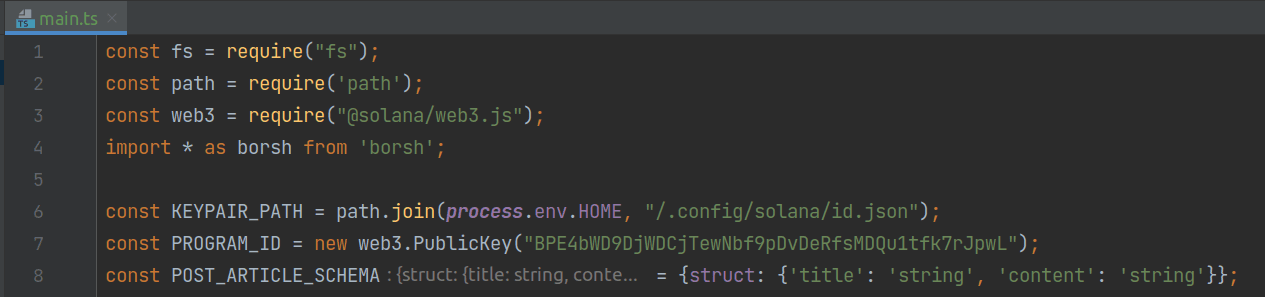
At the top of the script, we import all the necessary libraries and define three global constants. KEYPAIR_PATH indicates the path to the private key file generated using solana-keygen new, PROGRAM_ID is the address of the deployed program we have written in the last section, and POST_ARTICLE_SCHEMA is the object used for article serialization.

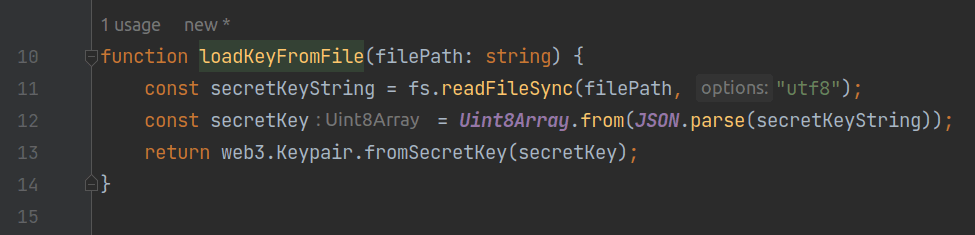
In the main body of the script, it first calls the loadKeyFromFile function to parse the private key file and obtain a Keypair object as the payer for transaction fees. Then, it uses the findProgramAddressSync method provided by @solana/web3.js to calculate the address of indexPda. This method uses the same algorithm as the Rust contract, ensuring that it computes the same address with the same parameters. The connection object specifies that we will use the devnet for testing.
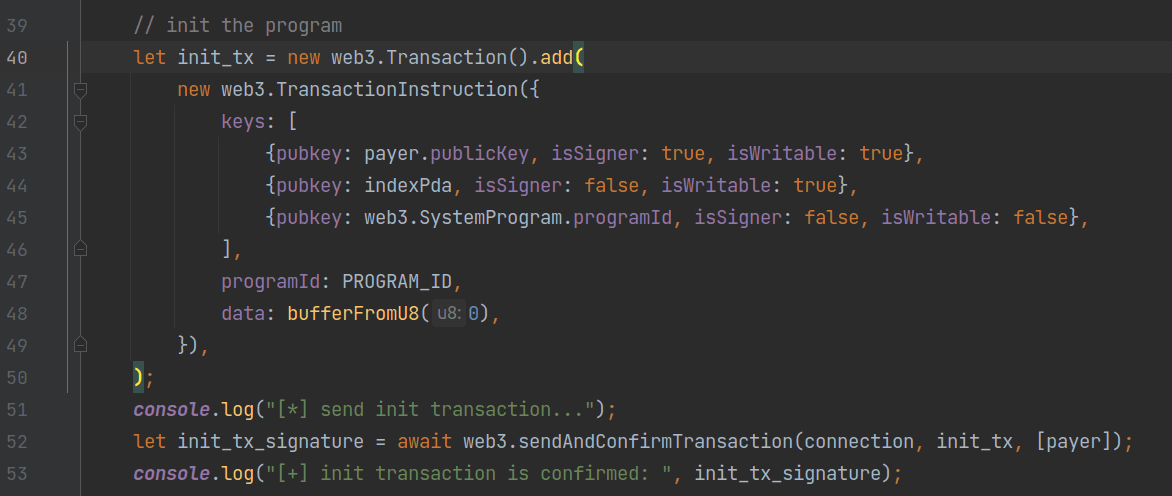
Next, we send the first initialization transaction. We create a transaction that contains a single instruction. The data field of this instruction contains only one byte "0", indicating that this is an invocation to the init instruction. The transaction is then sent and confirmed using sendAndConfirmTransaction.
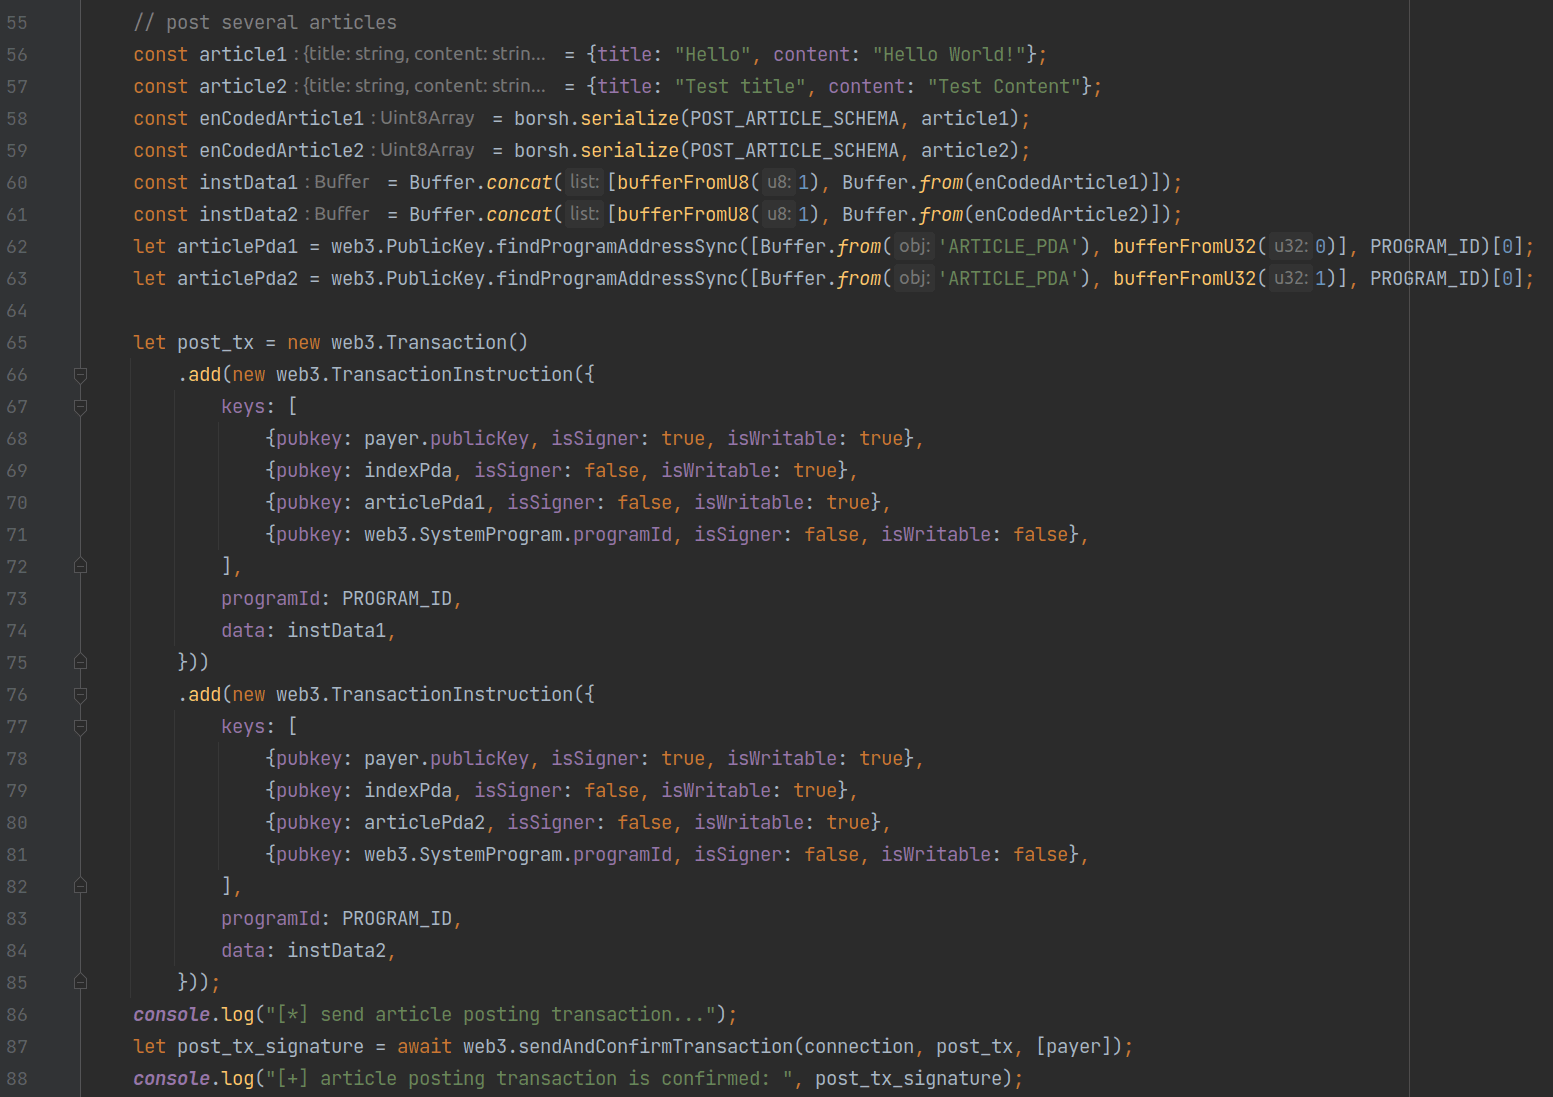
The second transaction invokes the post instruction to post some articles. From lines 56 to 63, the script serializes two articles and calculates the corresponding PDA addresses. Then two post instructions are added to a single transaction to create these articles.
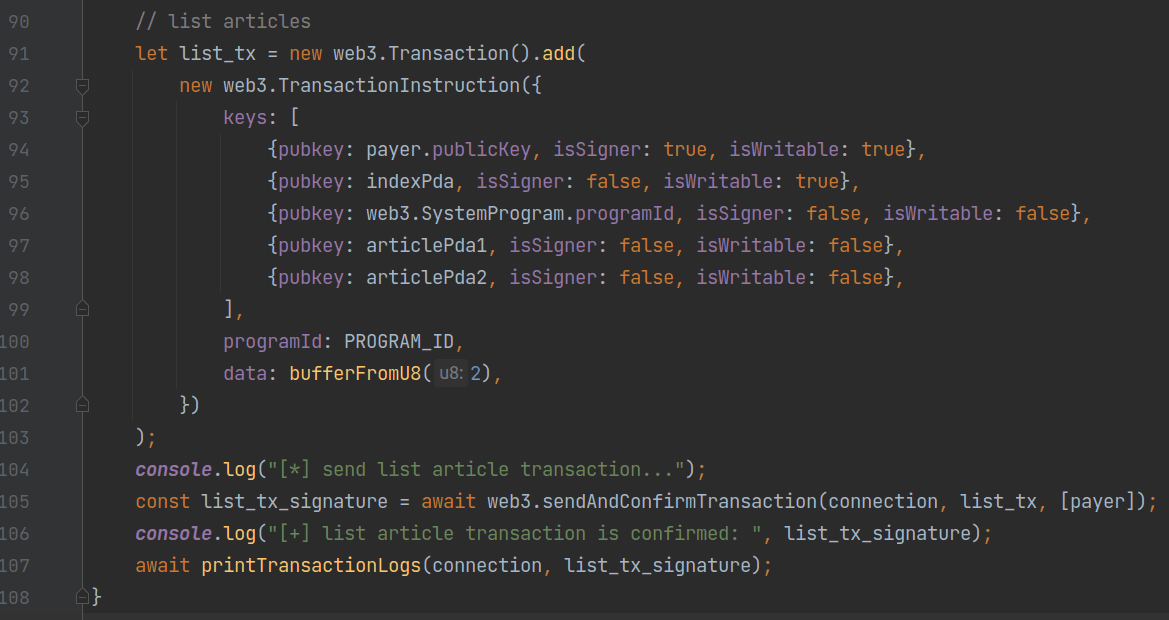
The final transaction invokes the list instruction, and then the logs are printed out after the transaction is confirmed.
To test the program with the script, replace the KEYPAIR_PATH with the path to your private key (if it is not the default path). Next, compile and deploy the Rust smart contract by executing the following commands:
cd program
cargo build-bpf
solana program deploy ./target/deploy/hello_solana.so
Then, copy the deployed address and paste it into the PROGRAM_ID field. In the root directory of the project, run npm install to install the dependencies, and then run npm start to execute the script.
After that, we can use Solscan to view the execution details of the testing transactions.
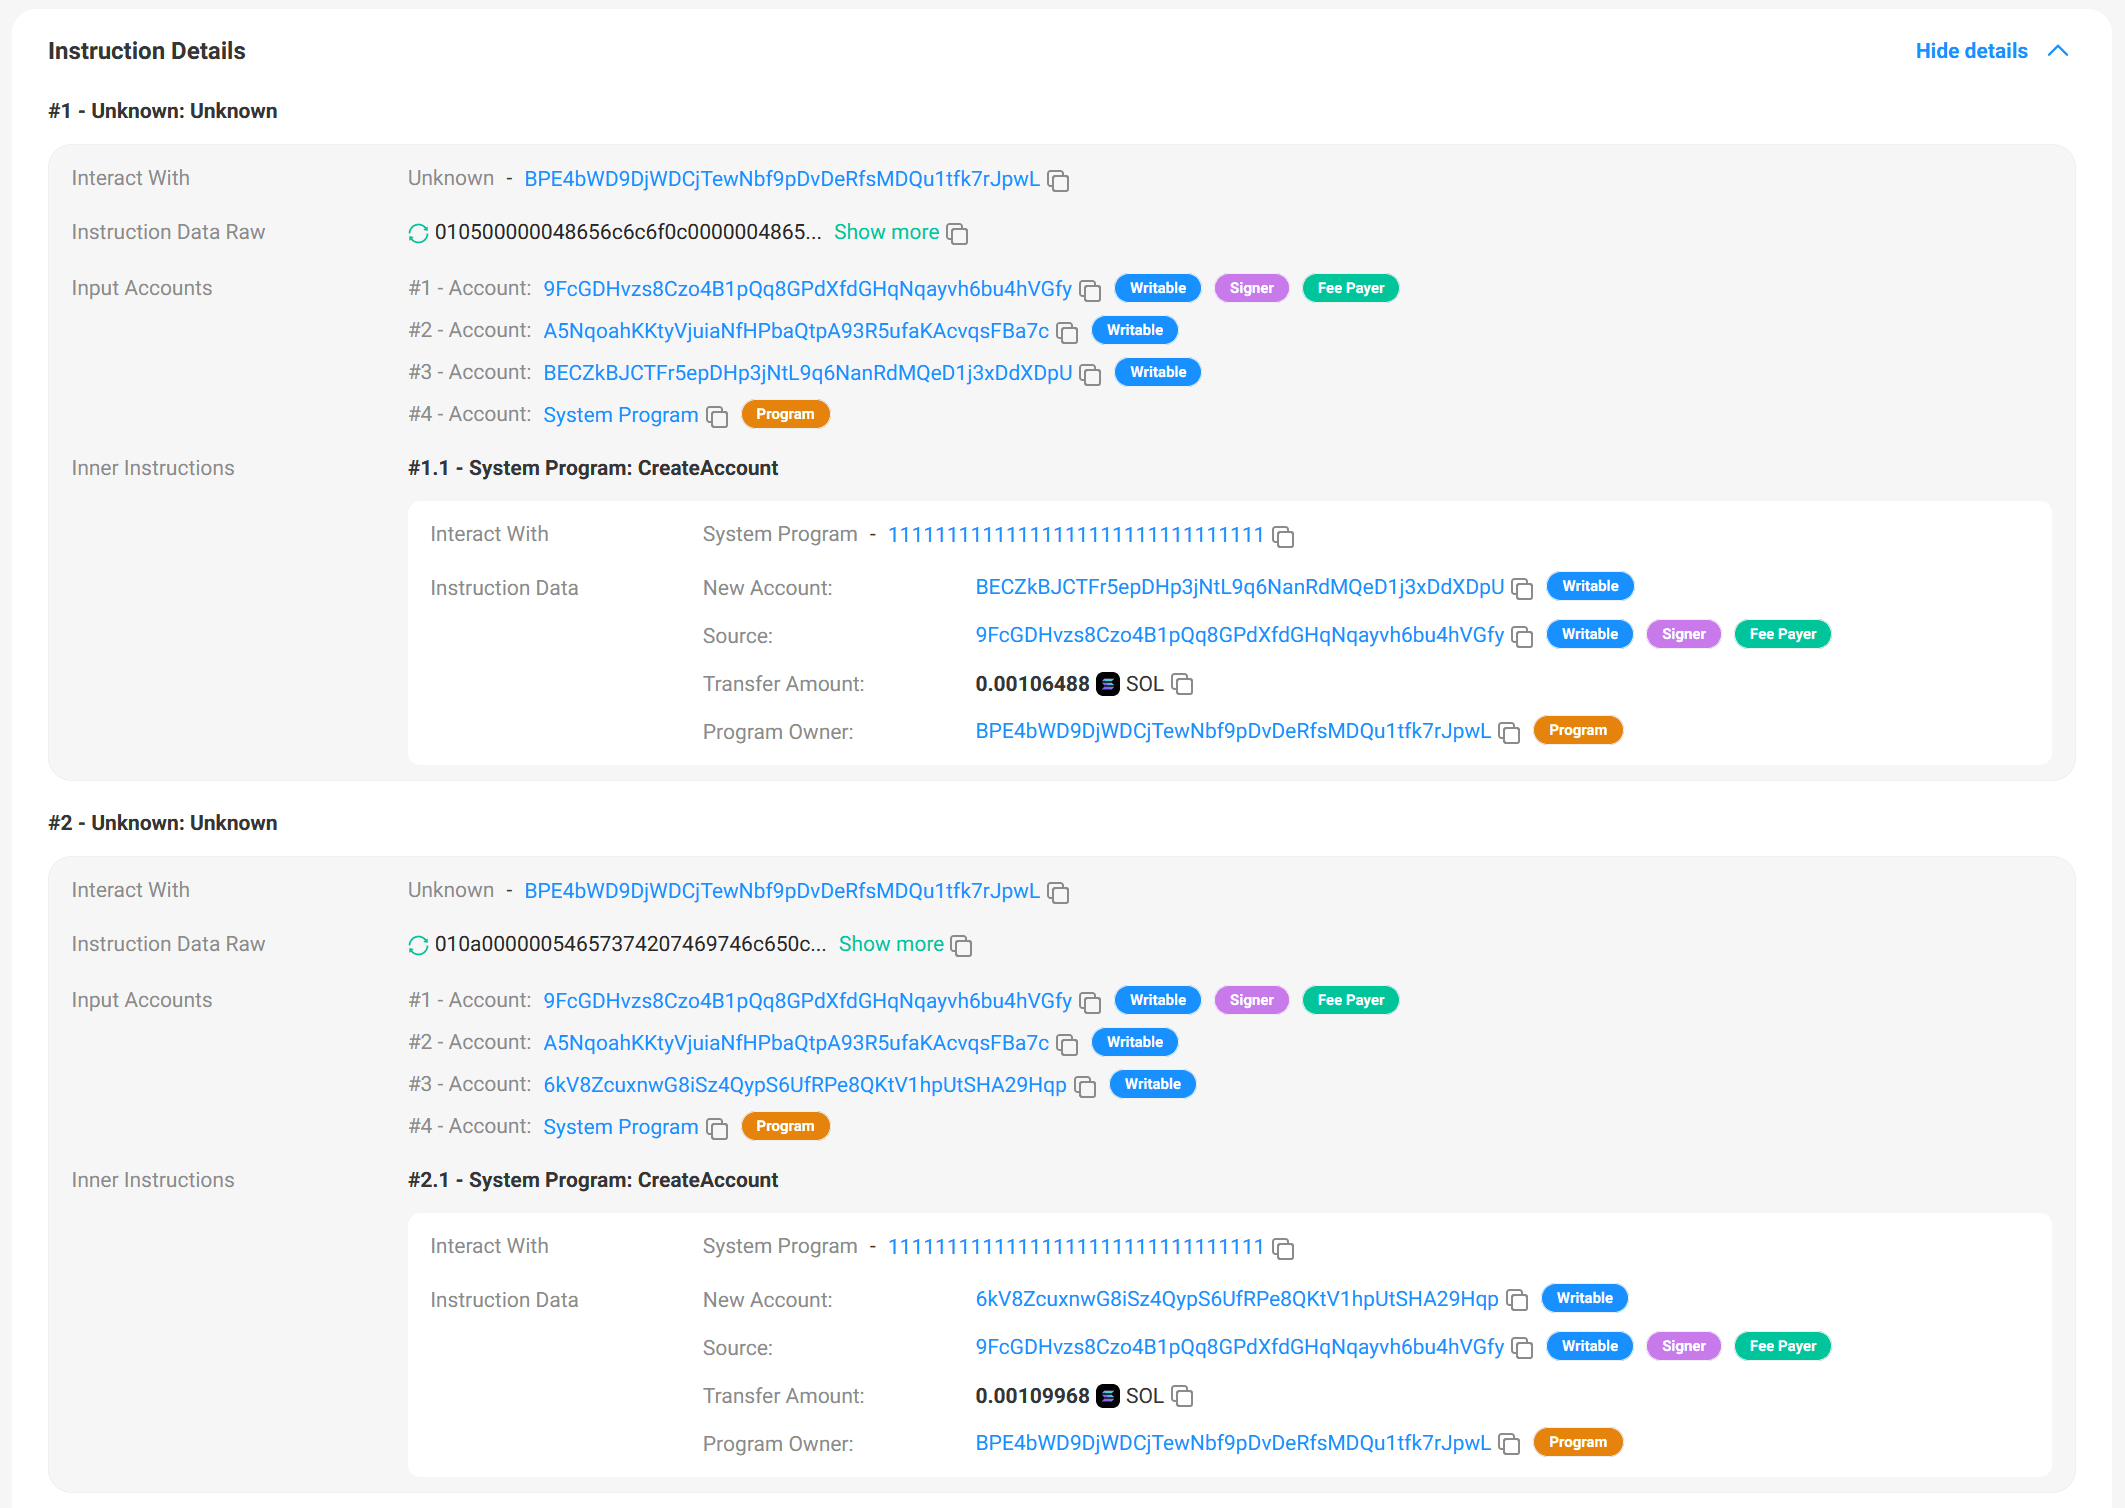
Let's directly look at the second transaction for publishing articles. It contains two instructions, each with the first byte of the Instruction Data Raw being 0x01. Additionally, each instruction includes an internal instruction, which is an invocation to the CreateAccount instruction of the System Program.
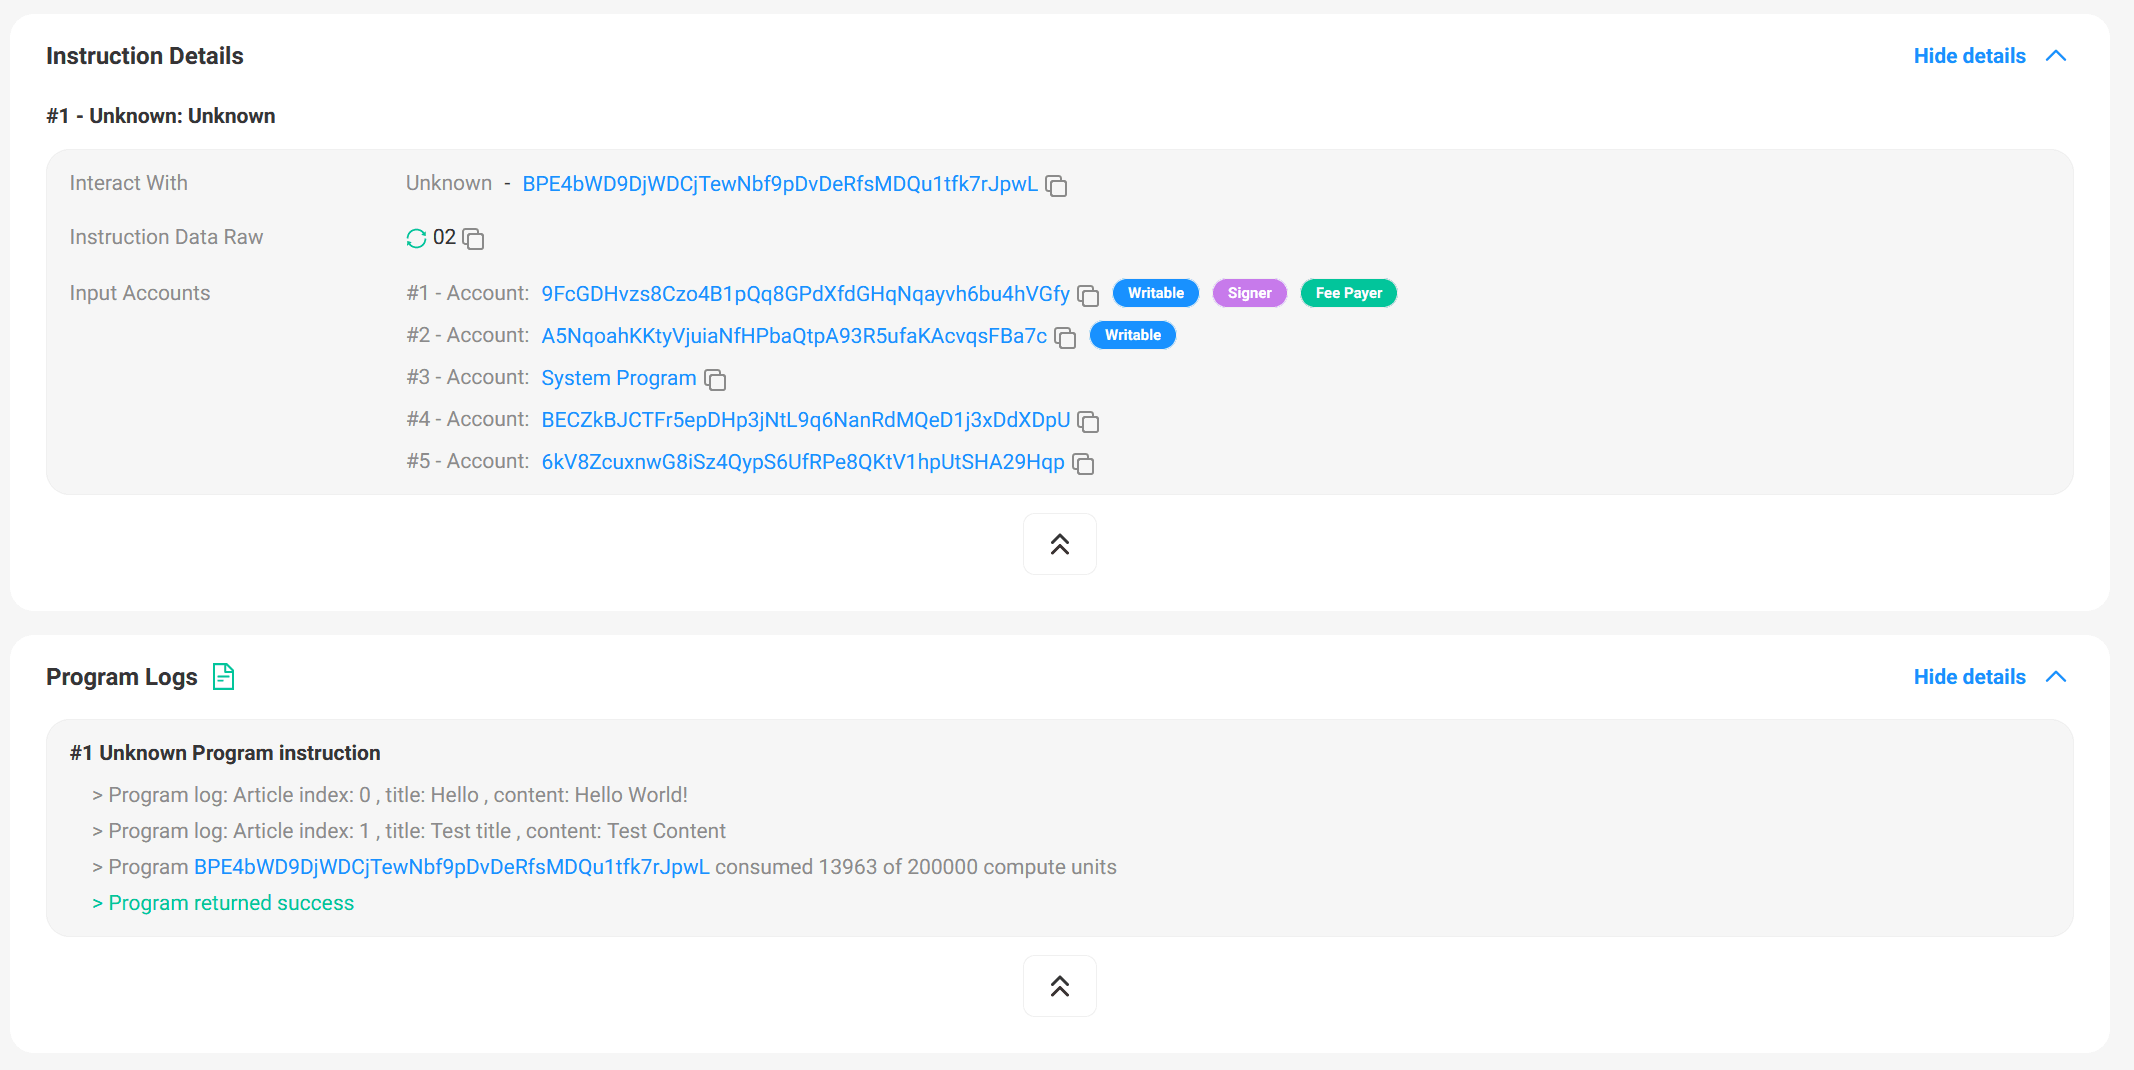
Similarly, we can inspect the third transaction for listing all articles. In the Program Logs section, we can find out that the indices, titles, and contents of the two articles are printed out.
Conclusion
In this article, we first explained how to set up the Solana programming and runtime environment locally. Then, we detailed the implementation logic of a Solana contract. Finally, we tested the contract functionalities using a TypeScript script. With this step-by-step tutorial, we believe you have learned how to write a simple Solana smart contract 🥳.
In the next article, we will provide a detailed guide on how to view and analyze Solana transactions using Phalcon Explorer (Phalcon Explorer now supports Solana). Stay tuned!