1. Introduction
Solana is a high-performance, permissionless Layer 1 blockchain system which supports programs (smart contracts) to be developed in different languages (e.g., Rust, C++, and C). With the help of the Tower BFT (Byzantine Fault Tolerant), it can handle thousands of transactions per second block times. One of the core innovations of Solana is Proof of History (PoH), a globally-available, permissionless source of time in the network that works before consensus. We will discuss PoH in more detail in the future.
2. Our Mission
BlockSec is a blockchain security company that takes “securing the DApp Ecosystem” as its mission. Thus, we provide not only contract audit service, but also the suggestions on how to write secure smart contacts for the whole community. Considering the popularity, high performance, and great design of Solana, this series will focus on the security of smart contracts in Rust on Solana.
3. Hello Solana
Before we discuss the Solana smart contracts from the pespective of security, we first need to know how to write, compile, and deploy the Solana smart contracts. Here we use Hello World as an illustration example.
3.1 Code Review
In Solana, a smart contract is called program. The Hello World program aims to maintain a counter , which records the number of times the target account (owned by program) called by the client, and prints this number as output.
Now let’s walk through the whole contract.
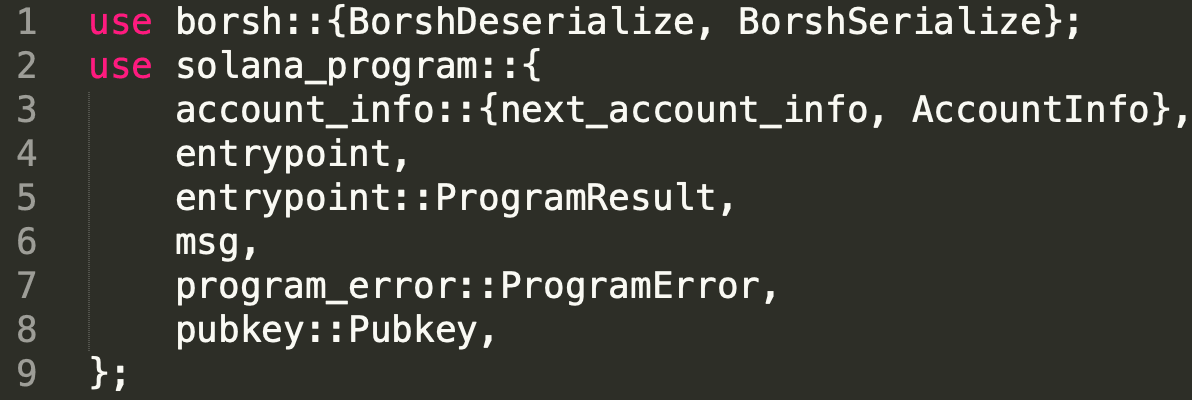
line 1 to line 9 bring lots of libraries into scope explicitly with the keyword use .
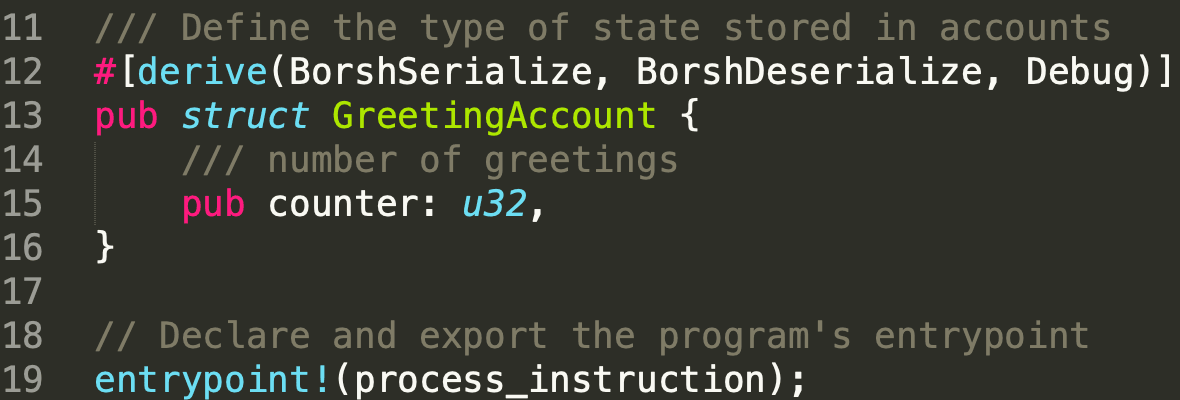
In line 12, [derive(BorshSerialize, BorshDeserialize, Debug)] is used to serialize and deserialize parameters passed to struct GreetingAccount, which is defined from line 13 to line 16. The struct contains a public member named counter in u32. After that, as commented, line 19 export the program’s entrypoint, which is function process_instruction .
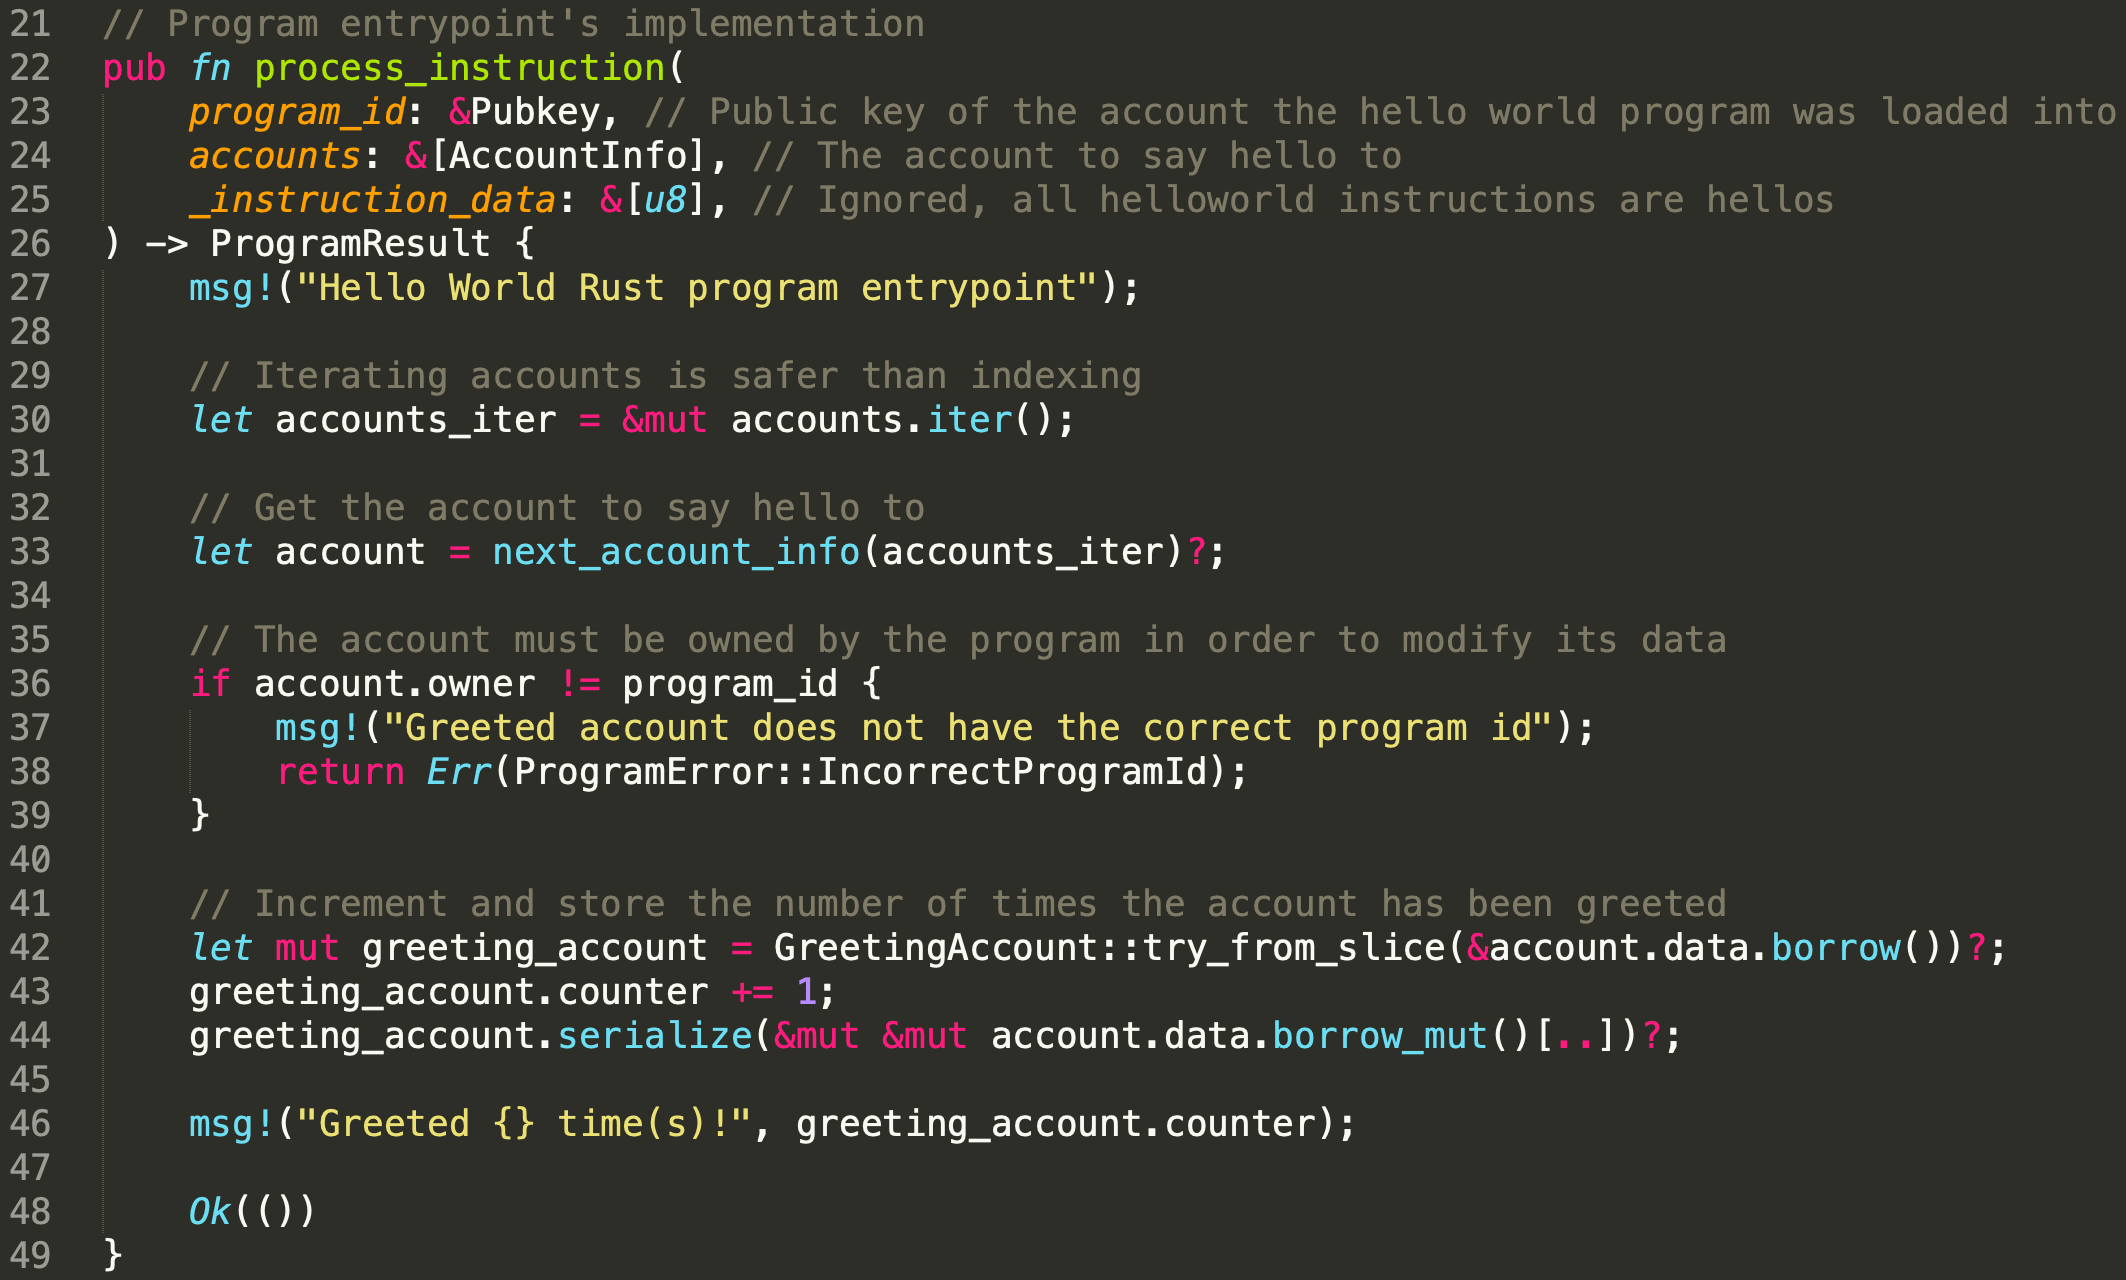
Function process_instruction accepts three parameters (i.e., program_id,accounts, and _instruction_data). Note program_id is the public key (i.e., address) of the deployed program while accounts contains the account to say hello to. The _instruction_data is empty and not used.
To know more about the programs and accounts in Solana, please refer to Solana documentation.
In line 27, a hello message is printed. From line 30 to line 33, the accounts will be iterated, and the specific account to say hello to will be extracted. After that, the owner of the account will be checked, and it should be equal to the program_id to ensure that the program can write into the account. Finally, the greeting_account will be extracted with try_from_slice, and the counter will be increased by 1.
3.2 Compile Program
To compile the program, we need to install the Solana CLI with the following command.
sh -c "$(curl -sSfL https://release.solana.com/v1.9.9/install)"To confirm that the Solana CLI is installed successfully, we can check its version with the following command.
solana --versionNote that Rust and NodeJS are aslo required.
To compile the program, we can use the following command.
cargo build-bpf --manifest-path=./src/program-rust/Cargo.toml --bpf-out-dir=dist/programThe compiled program will be generated under the directory specified in --bpf-out-dir, named helloworld.so.
3.3 Deploy Contract
To deploy the compiled program on Solana, we need to select a cluster first. In Solana, there are four different clusters and they are mainnet, testnet, devnet, and localnet. In this post, we deploy the compiled program on devnet only for demonstration.
We use the following command to specify the cluster.
solana config set --url https://api.devnet.solana.comAfter that, we need to generate the wallet for deployment. solana-keygen new --force helps to generate the walllet. For more information, please check Solana Doc.
Since the newly created account has no balance to pay for the transaction fees, we airdrop 1 SOL with the following command.
solana airdrop 1 <YourPublicKey> --url https://api.devnet.solana.comNow, we are ready to deploy the contract.
solana program deploy dist/program/helloworld.soUsers can check the programs, transactions in Devnet Explorer. In this demo, You can find the deployed program with this link.
3.4 Send Transaction
It is recommended to write scripts, which is called client, to send transactions in Solana. Fortunately, Solana provides the sample code. To run the client, we first need to install the client dependencies.
npm install After the installation is completed, we run the main function in file main.ts with the following command.
npm run start 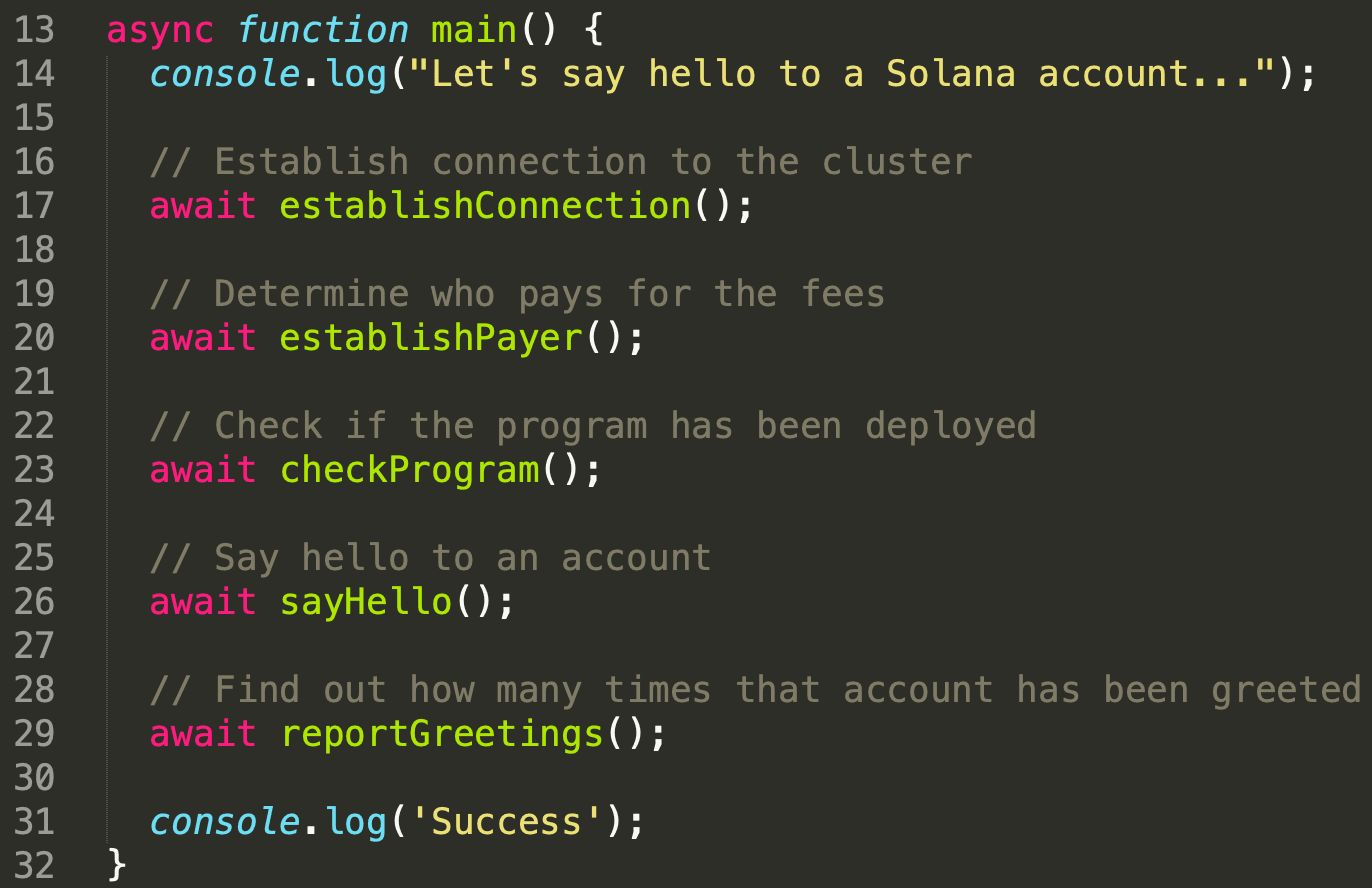
In function main , the client first establishes the connection to the specified cluster (i.e., Devnet) with function establishConnection(), checks the payer who pays for the transaction fees with function establishPayer, and validates the existence of the program and the account to say hello to with function checkProgram. Note that if the required account does not exist, it will be created by sending a transaction. In our demonstration, the account is created in this transaction.
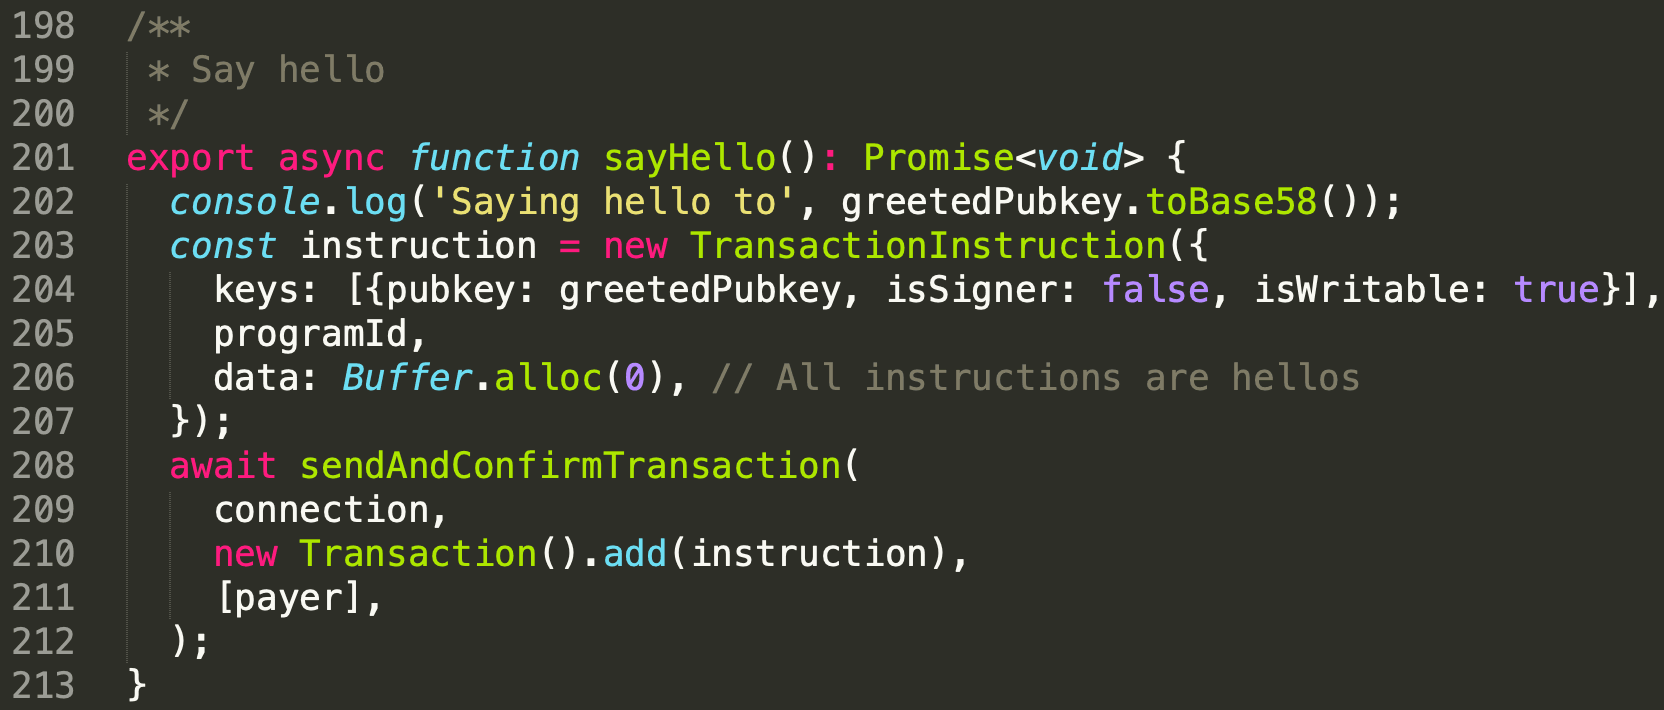
When everything is ready, function sayHello is invoked to say hello to the target account. The transaction consists one instruction. This instruction receives keys containing one account. The account's public key (i.e., greetedPubkey) is the target account to say hello to. Note that this account is used for storage, and it is not a signer. In this case, the attribute isSigner is false while isWritable is true. The programId is the owner of the greetedPubkey, and it is also the address of the deployed contract. Note that data is empty, and will not be used in this transaction. In line 208, function sendAndConfirmTransaction is invoked, and the transaction will be sent to the cluster.
You can view the detailed transaction here.
4. Conclusion
In this article, we briefly introduce the backround of the solana, and go through the sample project (i.e., Hello World ). We learn about how to deploy a program on Solana, and how to use the client to interact with the on-chain program. Please keep following our blog, we will publish more articles for this series consistently.