With the mainnet launch of Aptos network on Oct 18th, Move programming language and its ecosystem expand their influence continuously. To engage the community, we will release a series of articles to provide secure development practices in Move. We will lead you into the Move world through examples, explanations, and, most importantly, security practices.
TL;DR
This article will tell you:
- how to create and develop an Aptos application;
- what a module (i.e., smart contract in Move) looks like;
- how to compile and publish a module on your local network;
- how to interact with the module and check the emitted event in the browser.
0x1. About Move and Its Ecosystem
Move is an inheritance from Diem (the previous name was Libra before Dec 2020), designed for smart contract development. It is claimed to be safe, fast, and flexible, aiming at becoming the next-generation language. However, the newly introduced projects like Aptos and Sui do not adopt the original Move directly, while some modifications have been made to serve their needs.
Unless otherwise specified, we will mainly focus on the development practices in the context of Aptos, as the ideas are generic for other Move-based projects. We also assume that you have already gone through the MoveBook for a basic understanding of the Move programming language.
0x2. Prepare the Environment
0x2.1 Aptos Toolchain
Aptos has already integrated Move in its CLI. Therefore, it is recommended to follow the CLI installation to install the corresponding toolchain. Once the installation is completed, type aptos in the terminal, and you should see the following output:
$ aptos
aptos 1.0.1
Aptos Labs <[email protected]>
Command Line Interface (CLI) for developing and interacting with the Aptos blockchain
USAGE:
    aptos <SUBCOMMAND>
OPTIONS:
    -h, --help       Print help information
    -V, --version    Print version information
SUBCOMMANDS:
    account       Tool for interacting with accounts
    config        Tool for interacting with configuration of the Aptos CLI tool
    genesis       Tool for setting up an Aptos chain Genesis transaction
    governance    Tool for on-chain governance
    help          Print this message or the help of the given subcommand(s)
    info          Show build information about the CLI
    init          Tool to initialize current directory for the aptos tool
    key           Tool for generating, inspecting, and interacting with keys
    move          Tool for Move related operations
    node          Tool for operations related to nodes
    stake         Tool for manipulating stake and stake pools
0x2.2 Local Testnet and Account
Aptos provides several networks (i.e., mainnet, testnet, devnet and local testnet) for development and deployment. In this article, we’ll use the local testnet.
To launch the local testnet, type the following command:
$ aptos node run-local-testnet --with-faucet --force-restartYou should see the output:
......
Aptos is running, press ctrl-c to exit
Faucet is running.  Faucet endpoint: 0.0.0.0:8081
Now you can create your account by typing the following command (probably in another terminal window if you want to keep the previous one stay foreground):
$ aptos initThis command will bring you an interactive shell, which requires specifying some properties. Here we choose the local network. After that, there will be a .aptos folder in the current directory with your default account configuration in it. Check the file and copy your account address (e.g., c0d8xxxxxxxxxxxxxxxxxxxxxxxxxxxxxxxxxxxxxxxxxxxxxxxxxxxxxxxx14bd).
Tip#1: Keep your account configuration file safe! Your private key is written in it!
0x3. The First Hello World Program
Hello World program is always used as the first step in learning to write code. We’d like to follow this convention to demonstrate the way to develop Move applications.
0x3.1 Prepare the Package
Choose a directory you like and type the following command:
$ aptos move init --framework-local-dir "../../aptos-core/aptos-move/framework/aptos-framework" --name helloThis command will create a new Move package at the given location (i.e., the development workspace). Since some library functions in the Aptos framework are necessary, hence the local directory of the Aptos framework is specified (the relative path may need to be changed for a different location); alternatively, the git revision or branch for the Aptos framework can also be specified by using --framework-git-rev.
Now you could see a Move.toml file in your directory. This file not only lists some dependency configurations but also describes the package name and version. Besides, there also exists a folder named sources, which is used to store the Move source code. After creating a .move file in the sources directory, the workspace is ready to go.
[package]
name = 'hello'
version = '1.0.0'
[dependencies.AptosFramework]
local = '../../aptos-core/aptos-move/framework/aptos-framework'
[addresses]
BlockSec="c0d8xxxxxxxxxxxxxxxxxxxxxxxxxxxxxxxxxxxxxxxxxxxxxxxxxxxxxxxx14bd"
In the last line of Move.toml, we associate the account address (just created before) with BlockSec. It is used to publish the module (i.e., deploy the smart contract) in this package (will be discussed later). Note that the above address is just a placeholder, and you MUST replace it with your own account address.
0x3.2 Prepare the Module
Below is a simple but complete sample module, which can be directly put into the move file (e.g., hello.move). In the following, we’d like to go through the code to illustrate the difference between Move and other programming languages. You may skip this section if you are pretty familiar with them.
module BlockSec::hello{
    use aptos_framework::account;
    use aptos_framework::event;
    use std::signer;
    use std::string::{String, utf8};
    struct SecEventStore has key{
        event_handle: event::EventHandle<String>,
    }
    public entry fun say_hello_script(account: &signer) acquires SecEventStore{
        say_hello(account);
    }
    public fun say_hello(account: &signer) acquires SecEventStore{
        let address_ = signer::address_of(account);
        if(!exists<SecEventStore>(address_)){
            move_to(account, SecEventStore{event_handle: account::new_event_handle(account)});
        };
        event::emit_event<String>(&mut borrow_global_mut<SecEventStore>(address_).event_handle, utf8(b"Hello World!"));
    }
}
Here we define a module named hello which will be published to the BlockSec address. The entry function of this module is named as say_hello_script, which will invoke the say_function function. It is easy to figure out that this module is used to emit an event with "Hello World!" message (in the say_hello function). However, there still exist some details that need to be clearly explained.
Specifically, in order to use the event::emit_event function in the aptos_framework namespace, we need a event::EventHandle struct because the emit_event function has the following declaration:
/// Emit an event with payload `msg` by using `handle_ref`'s key and counter.
public fun emit_event<T: drop + store>(handle_ref: &mut EventHandle<T>, msg: T)
struct EventHandle<phantom T: drop + store> has store {
    /// Total number of events emitted to this event stream.
    counter: u64,
    /// A globally unique ID for this event stream.
    guid: GUID,
}
Notice that EventHandle does not have the key ability, which means we have to store it in another struct. Hence we define a struct named SecEventStore to store EventHandle:
struct SecEventStore has key{
    event_handle: event::EventHandle<String>,
}
Tip#2: We must consider the abilities of a struct in Move. Do remember only
**_key_**ability can be**_move_to_**. If a module returns a struct that only has**_store_**ability and you want to preserve it in the global storage, consider defining a new struct as a wrapper.
For simplicity, we use String to represent the message. So the final step of the say_hello function is:
event::emit_event<String>(&mut borrow_global_mut<SecEventStore>(address_).event_handle, utf8(b"Hello World!"));Tip#3: Move does not support the
**_String_**type natively. The standard library provides the ability for transmitting bytes vector to a**_String_**. Check the source code at their GitHub repo for more details.
To ensure every new user must register with a SecEventStore, we need first check the struct existence in the user account through the exists function. If the user does not have the resource, the function will create one and move it to the user account.
if(!exists<SecEventStore>(address_)){
    move_to(account, SecEventStore{event_handle: account::new_event_handle(account)});
};
0x3.3 Compile and Publish the Module
When the module is ready, we can compile it with the following command:
$ aptos move compile
Compiling, may take a little while to download git dependencies...
INCLUDING DEPENDENCY AptosFramework
INCLUDING DEPENDENCY AptosStdlib
INCLUDING DEPENDENCY MoveStdlib
BUILDING hello
{
  "Result": [
    "c0d8xxxxxxxxxxxxxxxxxxxxxxxxxxxxxxxxxxxxxxxxxxxxxxxxxxxxxxxx14bd::hello"
  ]
}
We may also test it if necessary:
$ aptos move test
INCLUDING DEPENDENCY AptosFramework
INCLUDING DEPENDENCY AptosStdlib
INCLUDING DEPENDENCY MoveStdlib
BUILDING hello
Running Move unit tests
Test result: OK. Total tests: 0; passed: 0; failed: 0
{
  "Result": "Success"
}
Now we can deploy the module on the Aptos network. Remember we have associated the account with BlockSec, because a user can only publish modules to accounts under her control. Besides, the faucet already funds the account with some APTs for paying gas fees. The only thing left is to publish the module in the Move package to the Aptos network, as follows:
$ aptos move publish --package-dir ./ --profile default
Compiling, may take a little while to download git dependencies...
INCLUDING DEPENDENCY AptosFramework
INCLUDING DEPENDENCY AptosStdlib
INCLUDING DEPENDENCY MoveStdlib
BUILDING hello
package size 1271 bytes
Do you want to submit a transaction for a range of [672200 - 1008300] Octas at a gas unit price of 100 Octas? [yes/no] >
yes
{
  "Result":
  ...
}
Again, it is an interactive shell as well, and the content of Result is omitted.
0x3.4 Interact with the Module
To make the module emit the event, just type the following command:
$ aptos move run --function-id default::hello::say_hello_script
Do you want to submit a transaction for a range of [34500 - 51700] Octas at a gas unit price of 100 Octas? [yes/no] >
yes
{
  "Result": {
    "transaction_hash": "0x9af16532de5e79803c823fe28e3251703927d93809274b76972d8e83c6fcd433",
    ...
    }
}
As an entry function, the say_hello_script function can be directly invoked. You can also write a script and invoke the say_hello function in your script.
Tip#4: For better interacting experience, defining some entry function is a good practice. You can also develop some scripts for users to interact with your project.
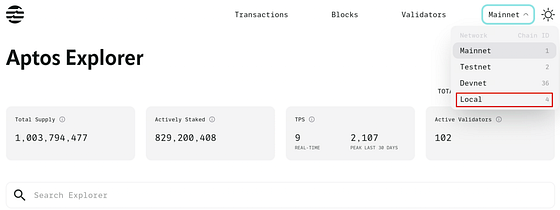
Unlike the traditional Web2 Hello World program, the emitted event will not be shown in the shell. Check the Aptos explorer and select the local network.
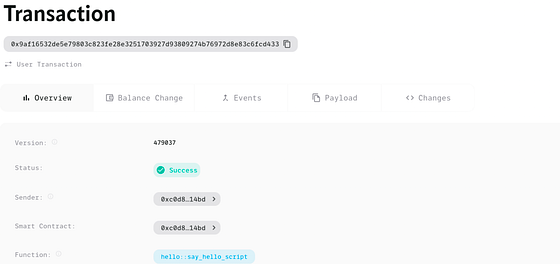
Then copy the value of transaction_hash from the shell and paste it into the search bar, and you'll see the transaction details.
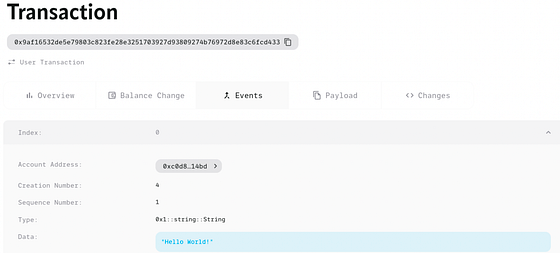
Finally, click the Events, the Aptos network will express her greetings to you.
0x4. What’s Next?
The Hello World program is just one small step for developing Move applications. In the coming series of articles, we will introduce more about developing safe and secure Move applications on Aptos. Stay tuned!
About BlockSec
BlockSec is a pioneering blockchain security company established in 2021 by a group of globally distinguished security experts. The company is committed to enhancing security and usability for the emerging Web3 world in order to facilitate its mass adoption. To this end, BlockSec provides smart contract and EVM chain security auditing services, the Phalcon platform for security development and blocking threats proactively, the MetaSleuth platform for fund tracking and investigation, and MetaSuites extension for web3 builders surfing efficiently in the crypto world.
To date, the company has served over 300 esteemed clients such as MetaMask, Uniswap Foundation, Compound, Forta, and PancakeSwap, and received tens of millions of US dollars in two rounds of financing from preeminent investors, including Matrix Partners, Vitalbridge Capital, and Fenbushi Capital.
Official website: https://blocksec.com/
Official Twitter account: https://twitter.com/BlockSecTeam