In this article, we will show how to build and deploy Uniswap V2 contracts, including the uniswap-v2-core and uniswap-v2-periphery, into Phalcon Fork. We also cover how to create a Uniswap v2 pool, add liquidity and perform a swap in the pool.
Background Knowledge
Before diving into this document, you must understand the following background knowledge.
- How Uniswap works
- The Uniswap V2 Smart Contracts
- Foundry: Foundry manages your dependencies, compiles your project, runs tests, deploys, and lets you interact with the chain from the command-line and via Solidity scripts.
- Deploy and verify contract
- Forge create command
BlockSec Phalcon Fork
Phalcon Fork is a specialized tool designed for Web3 developers and security researchers to conduct collaborative testing with private mainnet states. It allows users to create a Fork from any mainnet state and send transactions to the Fork via an RPC endpoint. This innovative tool has two key features that set it apart from other platforms.
- Firstly, it offers the ability to browse all transactions and, more crucially, debug them using the BlockSec Phalcon Explorer.
- Secondly, it boasts an internal block browser named Phalcon Fork Scan, akin to Etherscan, facilitating easier viewing of transactions and accounts within the Fork.
Compile Uniswap V2
Clone necessary source code
We want to use Foundry to compile the contract. First, we can create an empty foundry project.
# forge init hello_foundry
This will create a foundry project. Then we add v2-core and v2-periphery project as submodules.
# git submodule add https://github.com/Uniswap/v2-core.git contracts/v2-core
# git submodule add https://github.com/Uniswap/v2-periphery.git contracts/v2-periphery
We also need to add uniswap-lib as a submodule since the smart contracts in v2-periphery relies on this library.
# git submodule add https://github.com/Uniswap/uniswap-lib lib/uniswap-lib
This will clone the corresponding GitHub repository into corresponding locations.
Change the source code
We need to change the source code of contracts/v2-core/contracts/UniswapV2Factory.sol to add a global variable to record the init_code_hash of the UniswapV2Pair contract. This code hash is used by the v2-Periphery contract to compute the contract address of each dex pool, e.g., WETH and USDC.
bytes32 public constant INIT_CODE_HASH = keccak256(abi.encodePacked(type(UniswapV2Pair).creationCode));

Build
Then we create and edit the remappings.txt to make the compiler find corresponding libraries.
# cat remappings.txt
@uniswap/lib/=lib/uniswap-lib/
@uniswap/v2-core/=contracts/v2-core/
@uniswap/v2-periphery/=contracts/v2-periphery/
Change the default source code directory (to “contracts”) in foundry.toml.
>>cat foundry.toml
[profile.default]
src = “contracts”
out = “out”
libs = [“lib”]
# See more config options https://github.com/foundry-rs/foundry/tree/master/config
After that, we can compile the project.
# forge build
This will download the needed version of solc compiler and build the v2-core and v2-periphery contracts. The generated source code is under out directory.
Deploy into Phalcon Fork
Create a Fork
We need to create a Fork first. Go to the dashboard of Phalcon Fork, and then create a Fork inside a project. We can name this Fork as UniswapV2 or any other name you want. Note the RPC endpoint for this Fork.

Prepare Ether for the deployer
Before deploying the contract, the deployer should have Ether. If the deployer does not have enough Ether, we can use the Faucet to add Ether to the deployer address, or directly transfer Ether from another account.
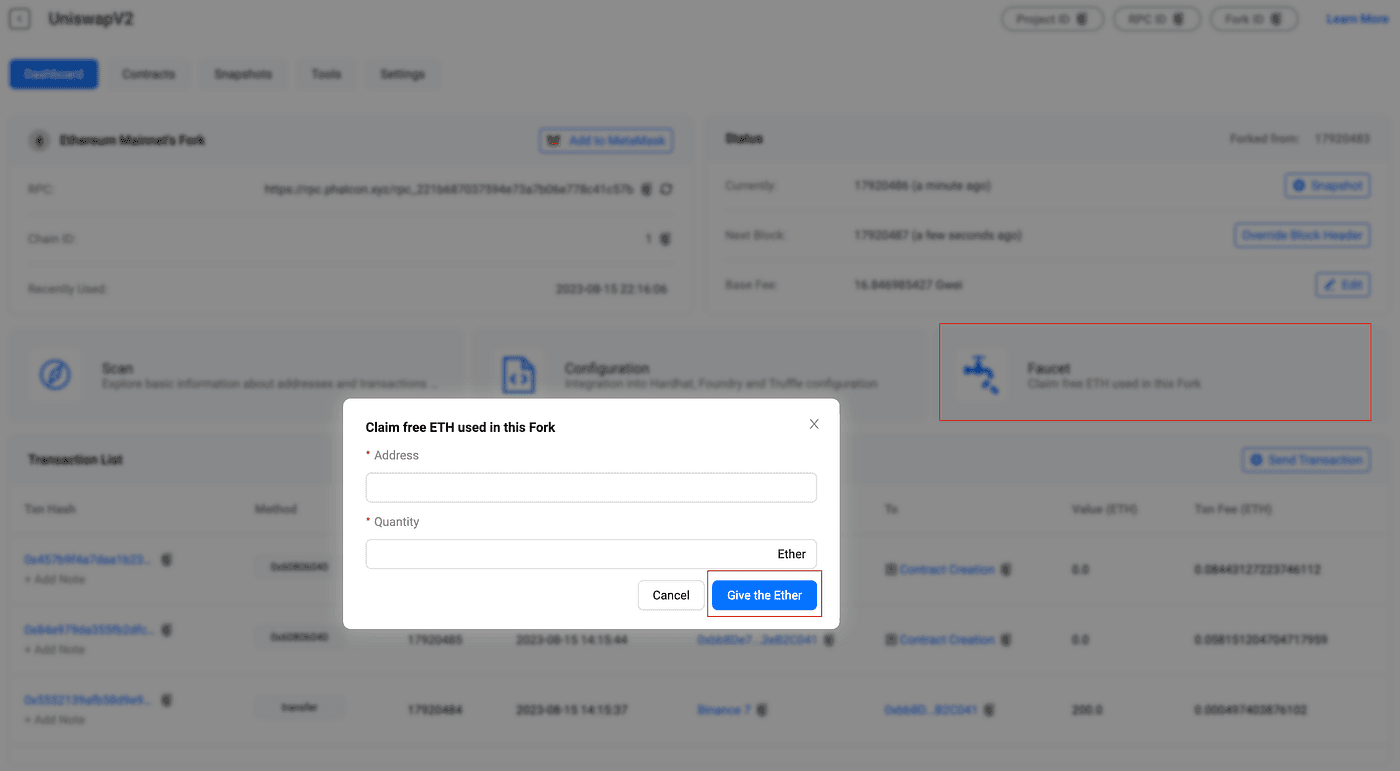
In this article, the deployer address is 0xbb8De73B06A0fF10e5ae9b65AaaeAEa22eB2C041. I used the second way to directly transfer Ether from the Binance Hot wallet to our deployer address. You can view this transaction.
Deploy UniswapV2Factory
We can use the forge-create command to deploy and verify the UniswapV2Factory contract. This contract is responsible for generating new dex pool.
forge create — rpc-url [RPC_URL] — private-key [DEPLOYER_PRIVATE_KEY] contracts/v2-core/contracts/UniswapV2Factory.sol:UniswapV2Factory — constructor-args [DEPLOYER_ADDRESS] — verify — verifier-url [API_URL] — etherscan-api-key [ACCESS_KEY]
The needed information in the command can be fetched from the configuration template. Click Configuration in the Fork to get the information.
The [DEPLOYER_PRIVATE_KEY] is the private key of the contract deployer address.
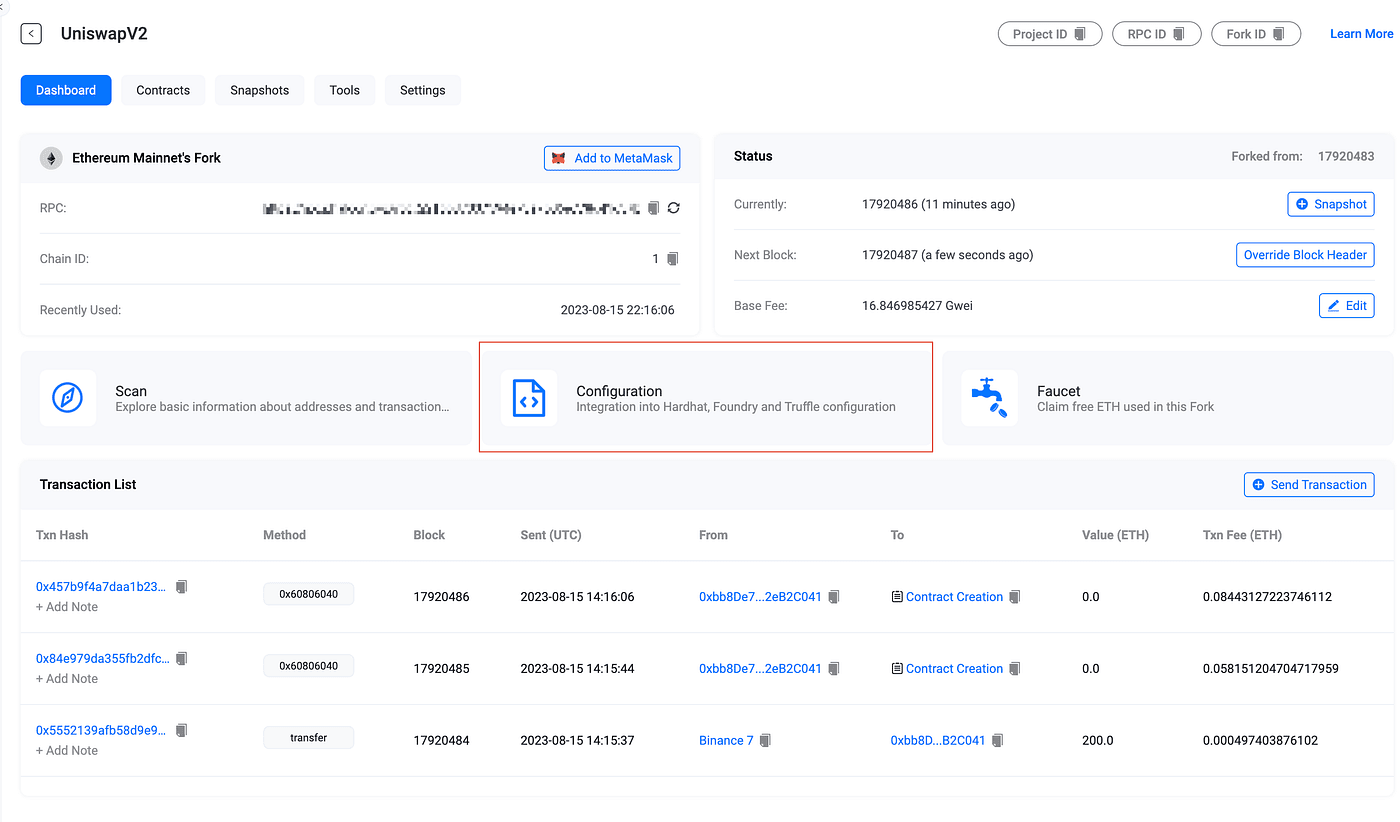
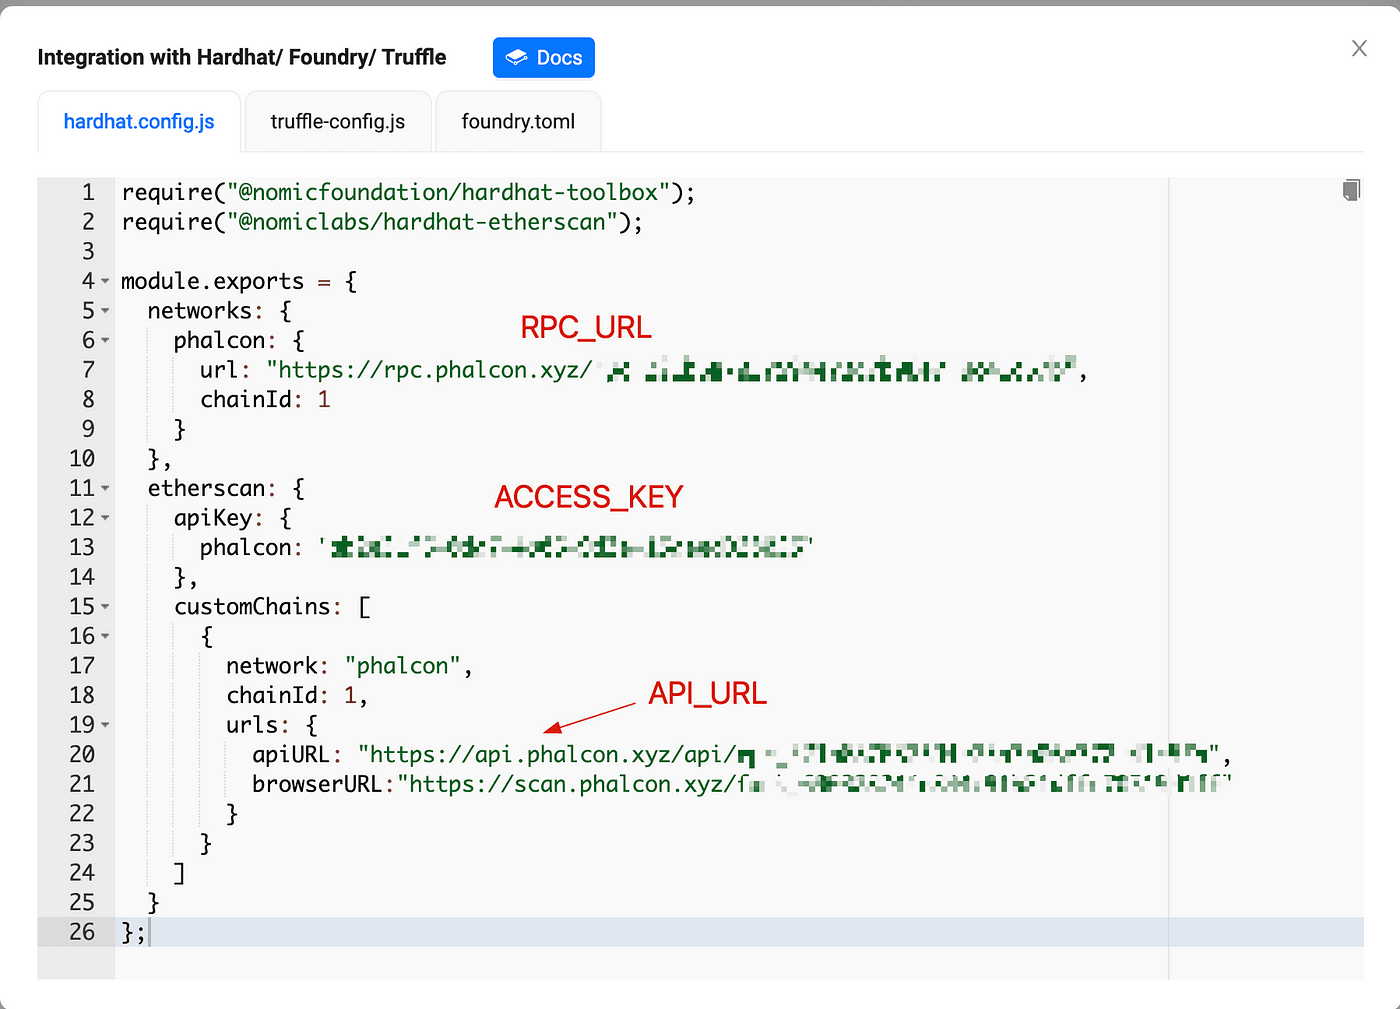
The above command will deploy and verify the contract. If you only want to deploy (but do not want to verify) the contract, do not add --verify --verifier [] --etherscan-api-key [] into the command.
The UniswapV2Factory contract is deployed to 0x24dd8cbe81075b16cf70666ac225113e9a57e8d9
Deploy UniswapV2Router02
Get INIT_CODE_HASH
Before deploying the router contract, we need to get the INIT_CODE_HASH of a pair. We can read the INIT_CODE_HASH of the deployed UniswapV2Factory contract.
# cast call — rpc-url [RPC_URL] 0x24Dd8CbE81075b16Cf70666AC225113E9a57e8d9 “INIT_CODE_HASH()”
Remember to change 0x24Dd8CbE81075b16Cf70666AC225113E9a57e8d9 to the deployed address of the UniswapV2Factory contract in your Fork.
In our Fork, this invocation returns 0x015238e5df4461ceff35c64639ad0883e13effba2231011ef724ef164254cc68 as the INIT_CODE_HASH.
Change the line 24 of contracts/v2-periphery/contracts/libraries/UniswapV2Library.sol to the returned INIT_CODE_HASH

Since we have changed the source code, we need to compile the contract again.
# forge build
Deploy the Contract
# forge create — rpc-url [RPC_URL] — private-key [DEPLOYER_PRIVATE_KEY] contracts/v2-periphery/contracts/UniswapV2Router02.sol:UniswapV2Router02 — constructor-args [ADDRESS_OF_DEPLOYED_FACTORY_CONTRACT] 0xC02aaA39b223FE8D0A0e5C4F27eAD9083C756Cc2 — verify — verifier-url [API_URL] — etherscan-api-key [ACCESS_KEY]
The two constructor args are the deployed factory contract address and the WETH contract address (0xC02aaA39b223FE8D0A0e5C4F27eAD9083C756Cc2).
This will deploy and verify the router contract.
Use the script for this purpose
For easy use, we created a Python script to deploy the contract.
https://github.com/yajin/phalcon_fork_uniswapv2/blob/main/deploy.py
Before using this script, three environment variables need to be set.
export PRIVATE_KEY=[DEPLOYER PRIVATE KEY]
export PHALCON_API_ACCESS_KEY=[ACCESS_KEY]
export PHALCON_RPC=[RPC_URL]
Use Uniswap V2
In the following section, I will show how to use the deployed contracts inside the Fork, including how to create a pool, add liquidity, and perform a swap.
Create a pair
The first step is to create a pair with two tokens. This is through the createPair function inside the factory contract we just deployed.
function createPair(address tokenA, address tokenB) external returns (address pair);
This function takes two token address, and then create a pair contract if the pool of these two tokens do not exist.
We can use cast command to issue the transaction to create a pair inside the Phalcon Fork. Cast is a command to perform Ethereum RPC calls. In particular, cast send can be used to sign and publish a transaction, while cast call can be used to perform a call on an account without publishing a transaction (not broadcasting to the blockchain).
To use cast send to publish a transaction, the to address is needed, which is the destination of this transaction. The sig and args are needed if the transaction is a function call. Foundry supports different types of function signatures, like someFunction(uint256,bytes32).
cast send — rpc-url [RPC_URL] 0x24dd8cbe81075b16cf70666ac225113e9a57e8d9 “createPair(address,address)” 0xC02aaA39b223FE8D0A0e5C4F27eAD9083C756Cc2 0xA0b86991c6218b36c1d19D4a2e9Eb0cE3606eB48 — from 0xf39Fd6e51aad88F6F4ce6aB8827279cffFb92266 — unlocked
- 0x24dd8cbe81075b16cf70666ac225113e9a57e8d9: the address of the deployed factory contract.
- 0xC02aaA39b223FE8D0A0e5C4F27eAD9083C756Cc2: WETH
- 0xA0b86991c6218b36c1d19D4a2e9Eb0cE3606eB48: USDC
We use the address 0xf39Fd6e51aad88F6F4ce6aB8827279cffFb92266 as the sender of this transaction. Note that this is a testing account, whose private key is public. DO NOT use this address in real cases!
We can get the created pair addresses from the transaction inside the Phalcon Fork. We can use the Phalcon Explorer to view this transaction. The created pair address is 0x6951da28b9751b864bd15f6ed9a6b2b25cb10723.
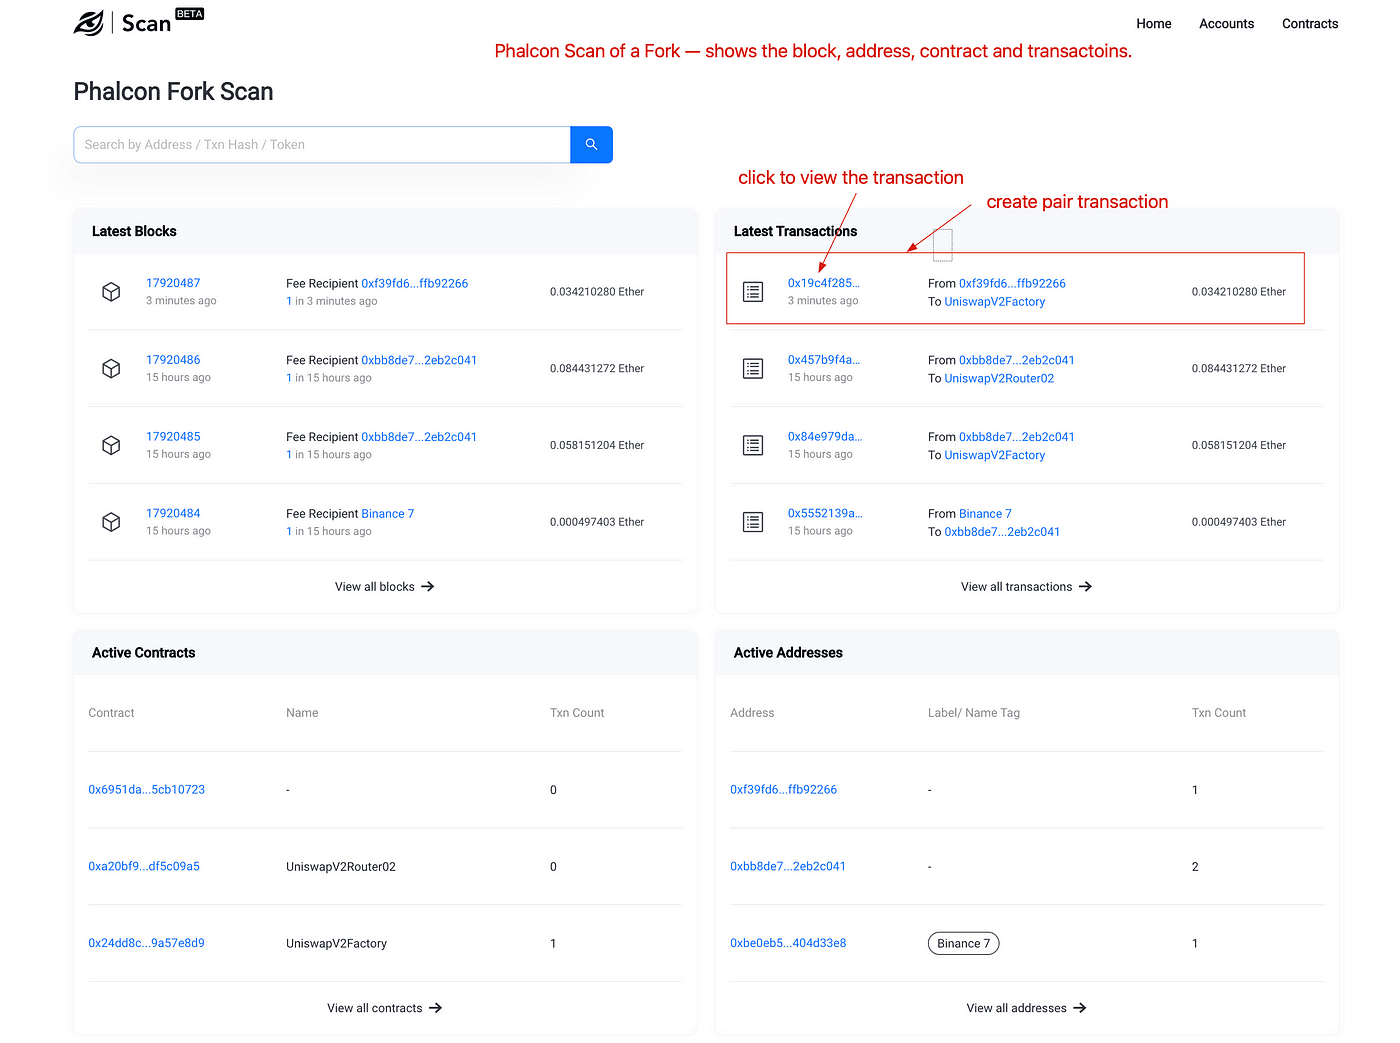
The Phalcon Scan of a Fork
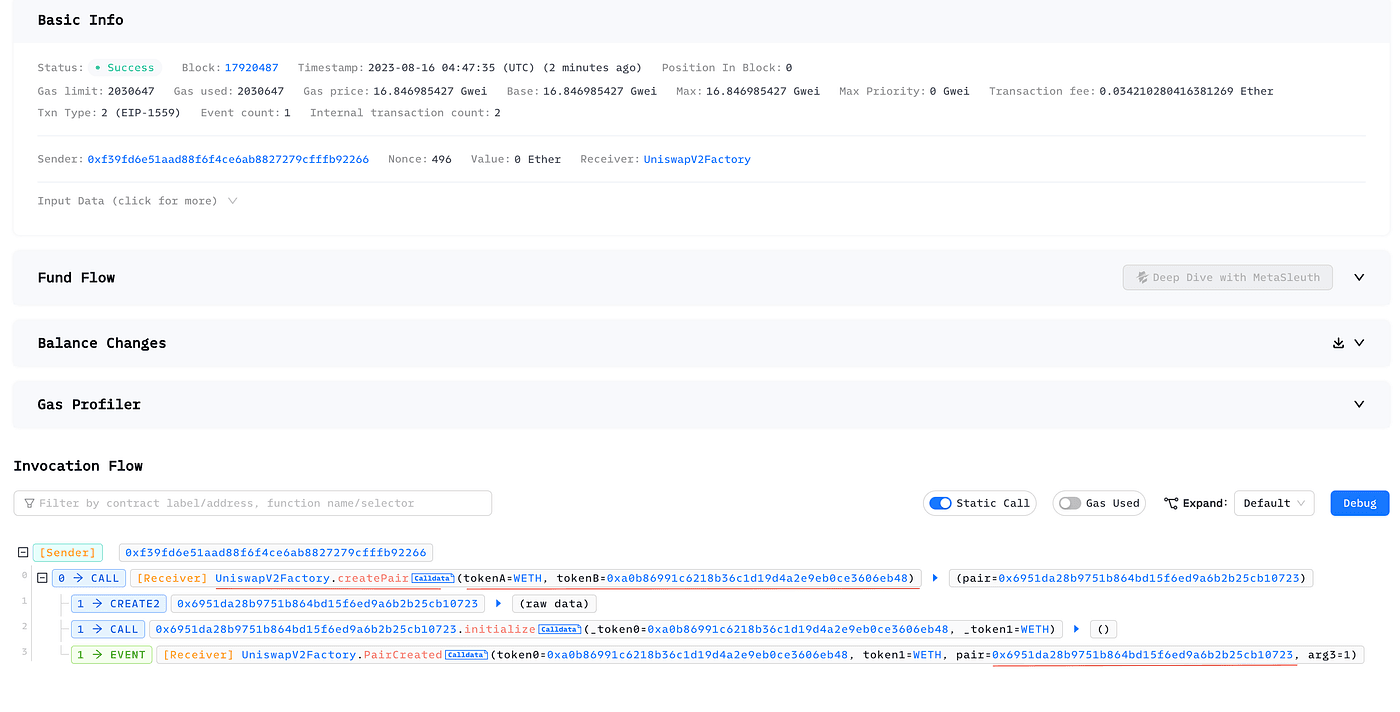
The transaction to create a pair — viewed using Phalcon Explorer
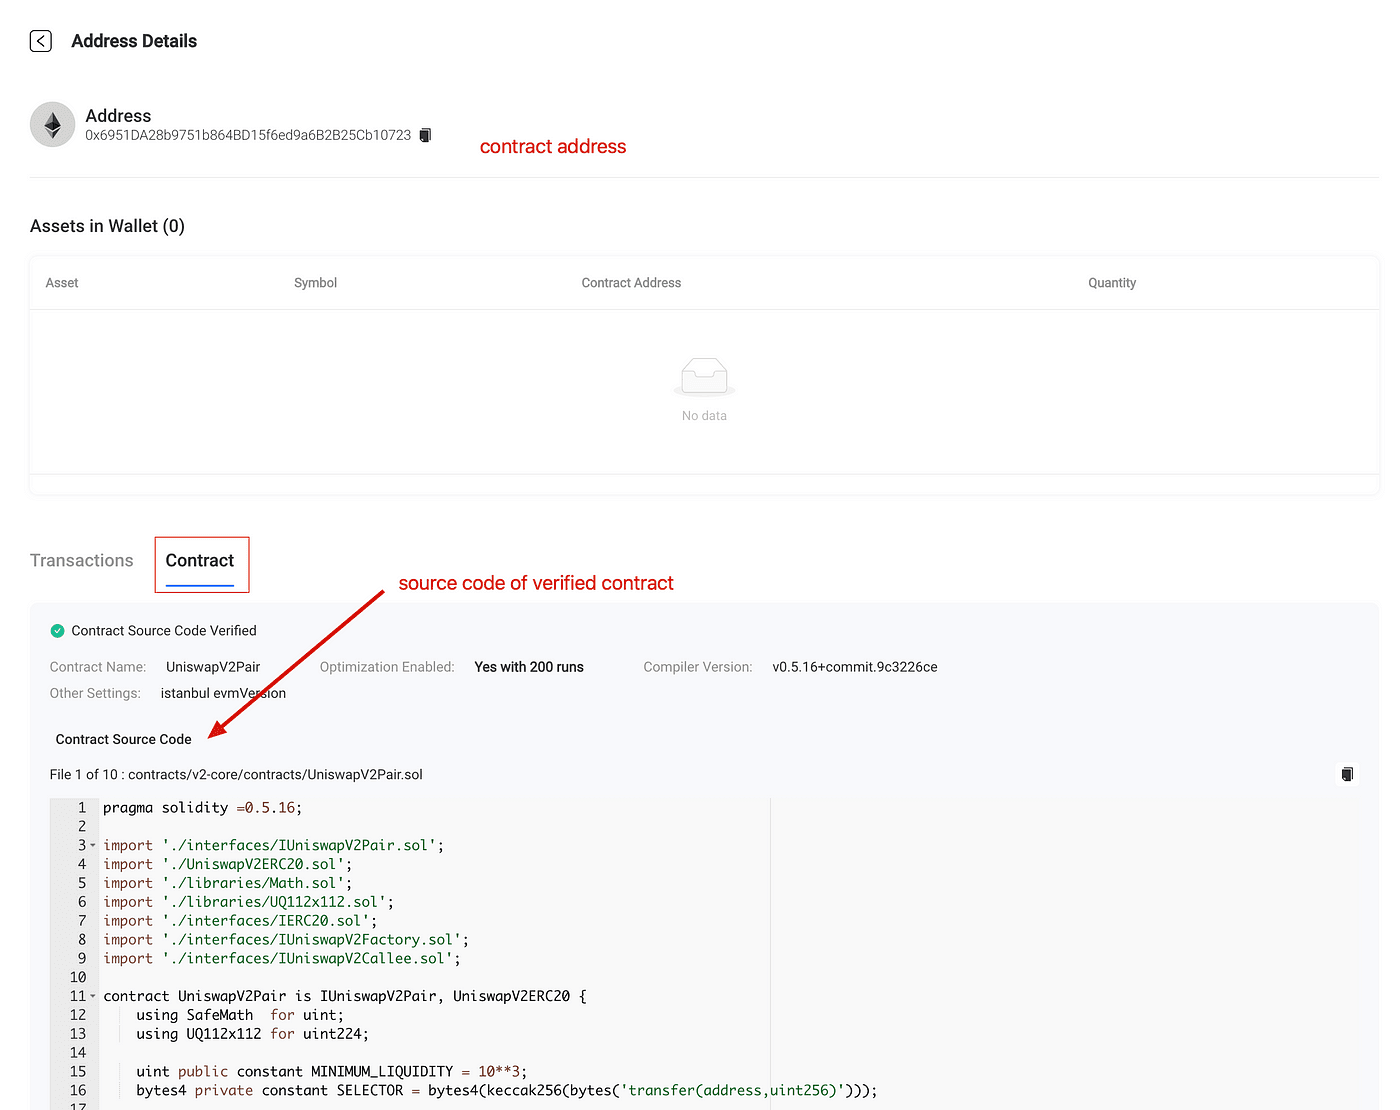
The pair contract is created using the factory contract. We can verify the created pair contract.
forge verify-contract — verifier-url [API_URL] 0x6951da28b9751b864bd15f6ed9a6b2b25cb10723 contracts/v2-core/contracts/UniswapV2Pair.sol:UniswapV2Pair — etherscan-api-key [ACCESS_KEY]
Note that, the address in the command is 0x6951da28b9751b864bd15f6ed9a6b2b25cb10723 , which is the newly created pair address.
A common error is using [FORK_URL] in the verifier. Please use [API_URL] instead (begins with https://api.phalcon.blocksec.com/xxxx).
Get WETH and USDC
After creating the pair, we need to add liquidity into the pair. This means the LPs can deposit WETH and USDC into the pair, and let LP token as a certificate of the share inside this pool.
For WETH, we can invoke the deposit function to deposit ETH into the contract and get WETH. For USDC, we can directly transfer from USDC from another address.
cast send — rpc-url [RPC_URL] 0xC02aaA39b223FE8D0A0e5C4F27eAD9083C756Cc2 “deposit()” — from 0xf39Fd6e51aad88F6F4ce6aB8827279cffFb92266 — unlocked — value 10ether
We deposit 10 Ether into the WETH contract, and get 10 WETH.
cast send — rpc-url[RPC_URL] 0xA0b86991c6218b36c1d19D4a2e9Eb0cE3606eB48 “transfer(address,uint256)” 0xf39Fd6e51aad88F6F4ce6aB8827279cffFb92266 2000000000000 — from 0x51eDF02152EBfb338e03E30d65C15fBf06cc9ECC — unlocked
- 0xA0b86991c6218b36c1d19D4a2e9Eb0cE3606eB48: to address. The USDC contract.
- “transfer(address,uint256)” : invoked function signature
- 0xf39Fd6e51aad88F6F4ce6aB8827279cffFb92266 2000000000000: args of transfer function.
We transfer 2M USDC from 0xf39Fd6e51aad88F6F4ce6aB8827279cffFb92266 to our address 0xf39Fd6e51aad88F6F4ce6aB8827279cffFb92266. The decimal of USDC is 6, so 2000000000000 means 2,000,000 USDC.
Now our address 0xf39Fd6e51aad88F6F4ce6aB8827279cffFb92266 has 10 WETH and 2M USDC.
Approve WETH/USDC to Router
Next step is to approve WETH/USDC to the router contract. That’s because when interacting with the router contract, it will directly transfer user’s token to the pool on behalf of the user.
Though the approval mechanism has some security loopholes, it still is commonly used in many contracts.
- Approve USDC and WETH
cast send — rpc-url [RPC_URL] 0xA0b86991c6218b36c1d19D4a2e9Eb0cE3606eB48 “approve(address,uint256)” 0xa20bf9733e1011C944D6334316456c52Df5C09A5 0xffffffffffffffffffffffffffffffffffffffffffffffffffffffffffffffff — from 0xf39Fd6e51aad88F6F4ce6aB8827279cffFb92266 — unlocked
cast send — rpc-url [RPC_URL] 0xC02aaA39b223FE8D0A0e5C4F27eAD9083C756Cc2 “approve(address,uint256)” 0xa20bf9733e1011C944D6334316456c52Df5C09A5 0xffffffffffffffffffffffffffffffffffffffffffffffffffffffffffffffff — from 0xf39Fd6e51aad88F6F4ce6aB8827279cffFb92266 — unlocked
In these two commands, we approve max WETH and USDC to 0xa20bf9733e1011C944D6334316456c52Df5C09A5 -- the deployed router contract.
Approving max value is NOT a good security practice (see our research)! We use this for demo purposes!
Add liquidity
The addLiquidity function in the UniswapRouter contract is used to add two tokens into the pool, and get the LP tokens as a certificate of the share in the pool. Read more about this function on this document.
We can add 1 WETH and 2,000 USDC into the pool.
cast send — rpc-url [RPC_URL] 0xa20bf9733e1011C944D6334316456c52Df5C09A5 “addLiquidity(address,address, uint, uint, uint, uint, address,uint)” 0xC02aaA39b223FE8D0A0e5C4F27eAD9083C756Cc2 0xA0b86991c6218b36c1d19D4a2e9Eb0cE3606eB48 1000000000000000000 2000000000 0 0 0xf39Fd6e51aad88F6F4ce6aB8827279cffFb92266 1991501602 — from 0xf39Fd6e51aad88F6F4ce6aB8827279cffFb92266 — unlocked
- 0xa20bf9733e1011C944D6334316456c52Df5C09A5: to address, deployed router contract.
- “addLiquidity(address,address, uint, uint, uint, uint, address,uint)”: function sig
- args
- 0xC02aaA39b223FE8D0A0e5C4F27eAD9083C756Cc2: tokenA 0xA0b86991c6218b36c1d19D4a2e9Eb0cE3606eB48: Token B
- 1000000000000000000: AmountADesired
- 2000000000: AmountBDesired
- 0: AmountAMin
- 0: AmountBMin
- 0xf39Fd6e51aad88F6F4ce6aB8827279cffFb92266: the receipt of the LP token
- 1991501602: deadline
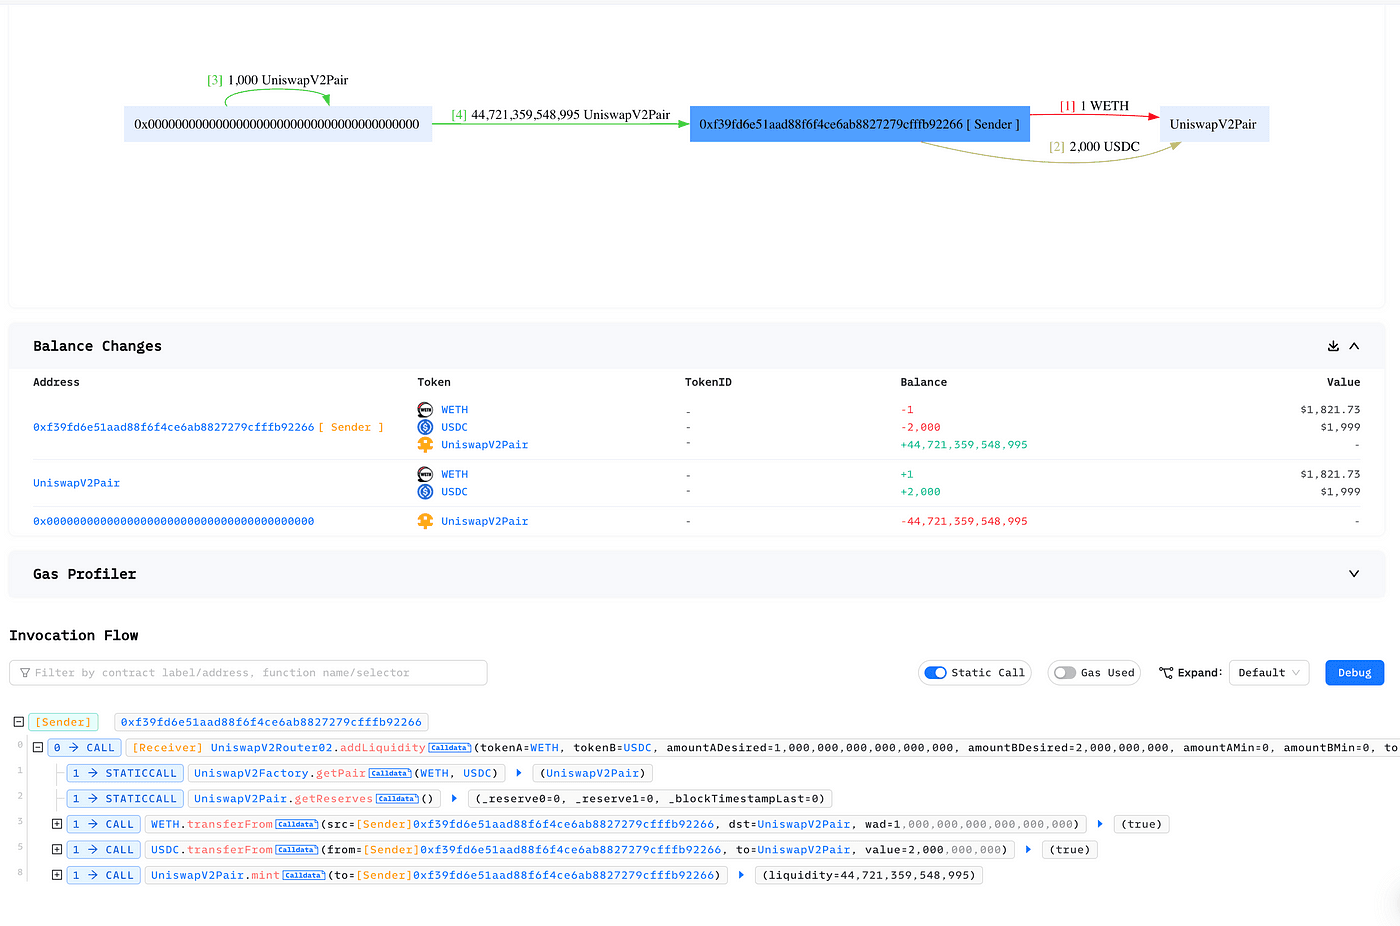
From the Phalcon Explorer of this transaction, we can see the balance changes and the invocation flow.
When adding liquidity into the pool, you need to consider the actual value of the token. We add 1 WETH and 2000 USDC into the pool only for demo purposes!
Swap
Now we have liquidity in the pool, and anyone can perform a swap in this pool. Uniswap provides a couple of methods to swap the tokens, and we use swapETHForExactTokens as an example. There are other functions can server the same purpose.
Receive an exact amount of tokens for as little ETH as possible, along the route determined by the path. The first element of path must be WETH, the last is the output token and any intermediate elements represent intermediate pairs to trade through (if, for example, a direct pair does not exist). Leftover ETH, if any, is returned to msg.sender.
This function swaps an exact amount of tokens using as little Ether as possible. The exact number of Ether needed is determined by the constant product formula. See the document for more information.
cast send — rpc-url [RPC_URL] 0xa20bf9733e1011C944D6334316456c52Df5C09A5 “swapETHForExactTokens(uint,address[], address, uint)” 100000000 “[0xC02aaA39b223FE8D0A0e5C4F27eAD9083C756Cc2,0xA0b86991c6218b36c1d19D4a2e9Eb0cE3606eB48]” 0x3C44CdDdB6a900fa2b585dd299e03d12FA4293BC 1991501602 — from 0x70997970C51812dc3A010C7d01b50e0d17dc79C8 — unlocked — value 5ether
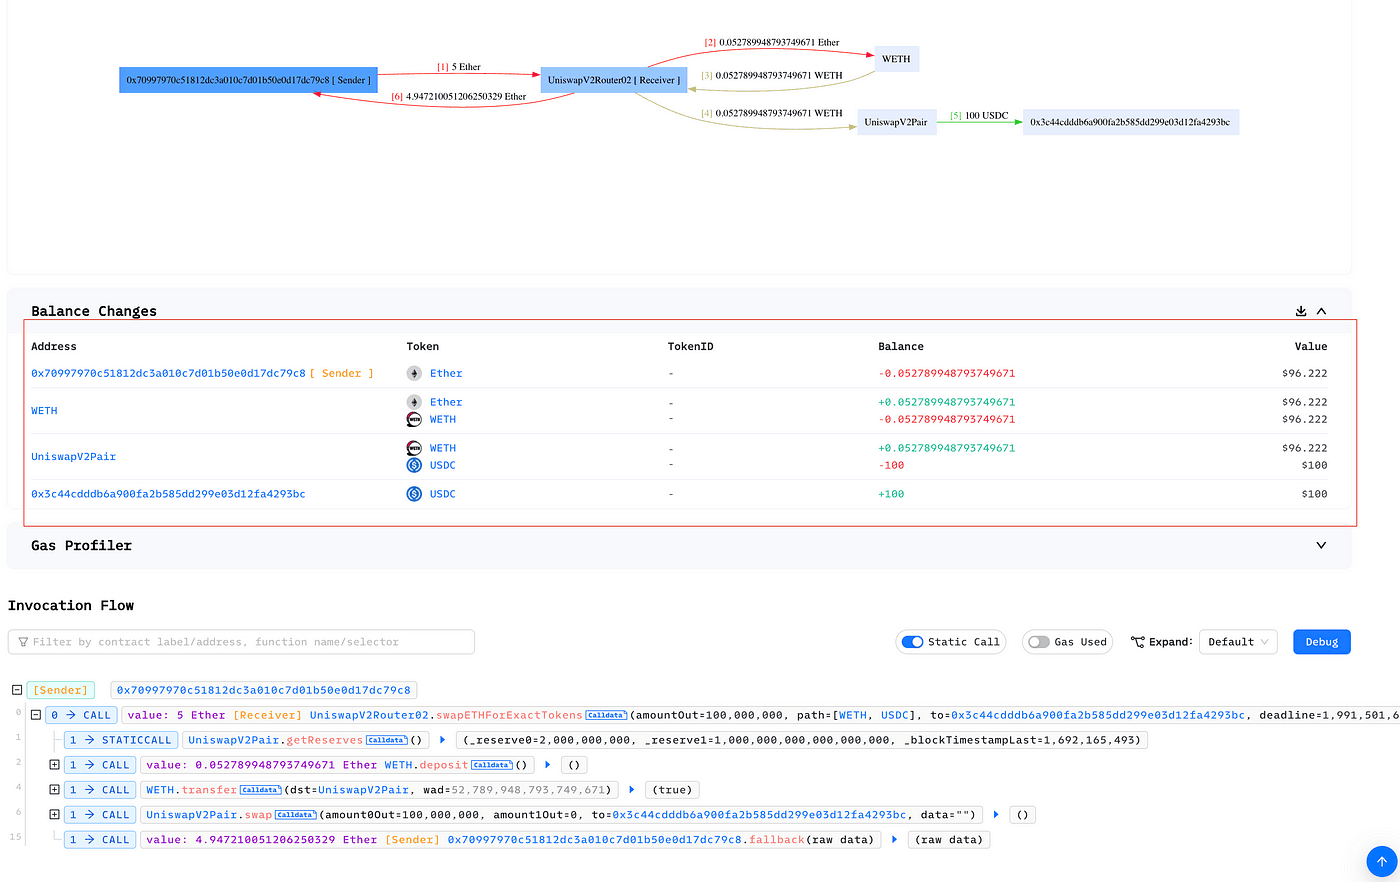
This command tries to swap 100 USDC by sending 5 Ether. As shown in the Phalcon Explorer, the actual used Ether is around 0.05 Ether, and the remaining one is returned to the caller.

Again, we can swap 1000 USDC more. This time, around 1.17 Ether was used.
Debug a transaction
One may wonder how may Ether is needed to swap the token. We can use the Debug functionality to debug a transaction -- the second one to swap 1000 USDC.
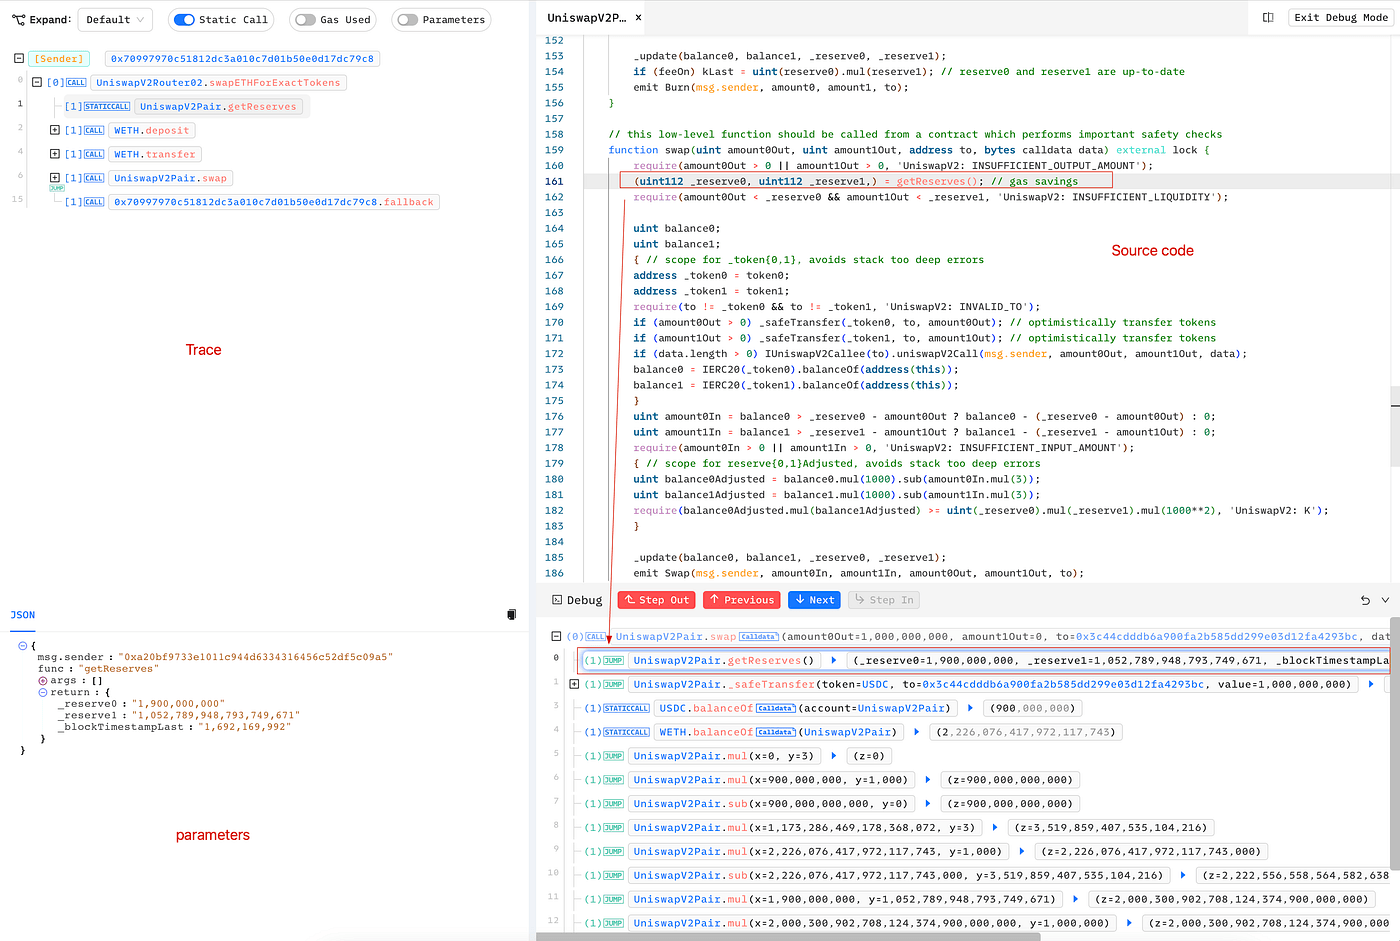
You can use Next to navigate the source to see the core logic of _swap function. Refer the Phalcon Explorer manual of how to use the Debug functionality to dive into a transaction.
Summary
In this blog, we describe how to deploy Uniswap V2 contracts into Phalcon Fork step by step and how to interact with the deployed contracts inside the Fork. More importantly, we also illustrate how to use the Phalcon Explorer to view and debug a transaction and Phalcon Scan to view the transactions/addresses/contracts inside a Fork.
All the transactions this blog illustrates can be found inside the following Phalcon Scan (for a Fork).
https://phalcon.blocksec.com/fork/scan/fork_690328244e844c91b21dffe70519d1ff
Take a look and have fun with Phalcon Fork.


